

It has been a couple of years since I owned a scooter. It must be my mischievous Italian blood, but I miss tooling around on one. That, plus my frugal nature of owning something that can get 50+ mpg doesn't hurt either. In my nerdy math, it goes something like this:
pleasure
---------------------- *raised to the pwr of internal combustion
economy of locomotion
Meaning, the power to get from Point A to Point B with the most pleasure and the most frugally......with an engine attached. The answer to this formula for me is the venerable scooter in all its variants.
So, I was on the hunt again for a scooter I could fix up and ride around town and perhaps to work on nice days. The rub for tall guys is that our knees are crushed against the dashboards of most scooters. The exception are cruiser-styled scooters, like the Yamaha Morphous and the Honda Helix. I have owned a Morphous briefly and it was a nice machine. I sold it during one of my 'downsizing' episodes.
I have been an admirer of Honda Helix's every since I met two nice ladies who owned identical ones in upper Minnesota. I see Helixs' rarely around town as they are out of production. But - like most Honda's - they are bullet-proof and have a great reputation for low maintenance and reliability. Add the geek-chic factor, and I was hooked.
I found this one on Craigslist very close to my home and the price was right. 1998, with 4800 miles, new tires and new battery....$1500. I bought it after a test run and it tracked true. I was also excited that the very expensive - and increasingly hard to get - plastic parts weren't cracked.....or so I thought.
Only after a close inspection at my home in the sunlight, it revealed two lower panels are cracked. Ugh.
So, here's the plan of attack: I want to take all the plastic off and re-paint it. I will order after market lowers in glossy black. The plastic hump cover, handle bar covers and dash will get repainted. The muffler needs some surface rust removed and then painted. I will install the intake manifold brace. A new windshield will be ordered. The broken tail light lens needs to be replaced. Replace air filter and replace gear oil. I already changed the oil filter at the 5000 mark just to keep it on the thousands because you have to change the oil every 1000 miles and this will be easier for me to remember. I will also checked the brakes, but I think at 5000 miles, they should be okay. Oh, and I also ordered a cheap luggage rack from EBay which I will install.

After riding it to work a few times, I realized - like my Goldwing and other cruisers - I was going to need a backrest. I just like the support and my back appreciates it.
So, I am going on a Starved Rock run on our last day of work before Summer vacation. Also, I am planning an around the lake (Lake Michigan)trip with the scooter gang from work, so job one is to get that drivers backrest.
There aren't many bolt on options. I didn't have the time to be very creative or else I may have bought a used headrest off a car and configure a way to affix it to the seat. So, the only real option I could find is a Utopia backrest. A pricey option at $200, but I have had them on my Goldwings before and they are really nice.
About costs. I like to have a running cost sheet at the bottom of my project pages to keep track of my indulgences. So, anytime you check this, you can scroll to the bottom for a running total of things I bought for the scoot.
So, let's put that backrest on......
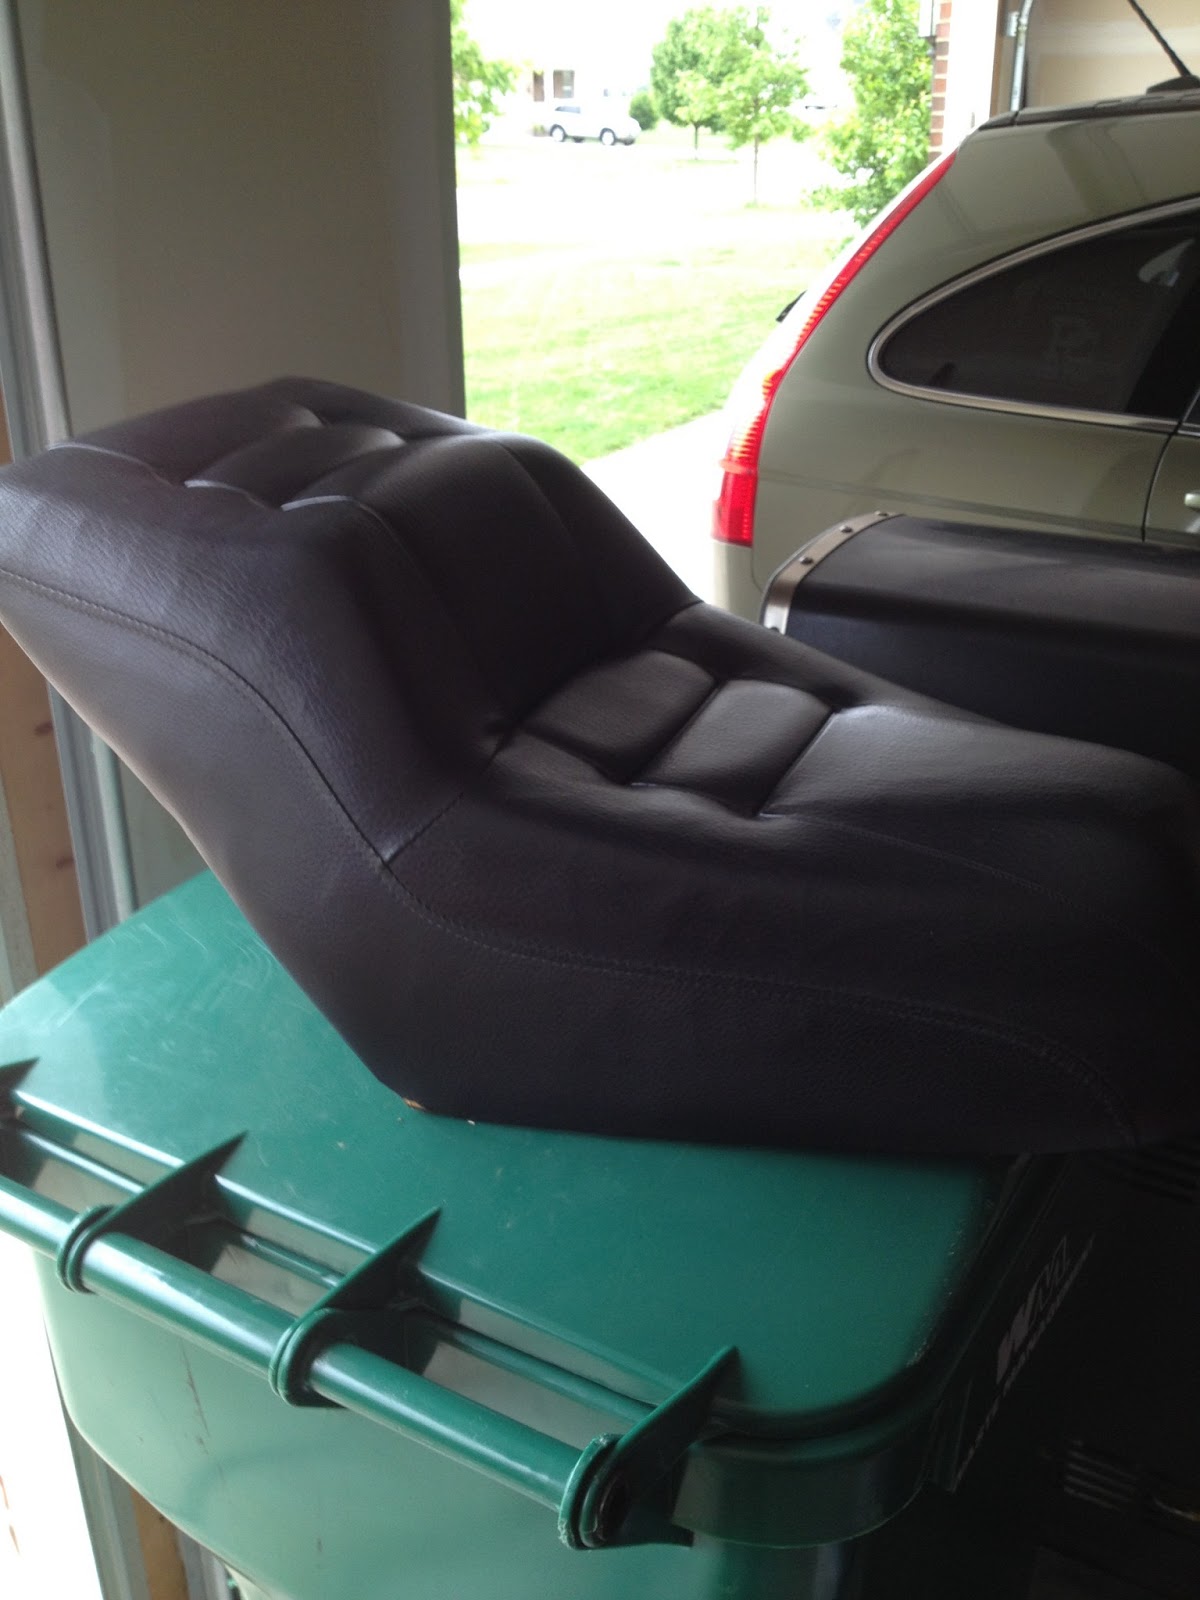

I'm not going to lie to you, it is a simple operation but kind of a PITA. The support bar goes through the seat and bolts to an anchor plate underneath the seat.


I put blue tape on the seat where I needed to mark it to slice the slit in the seat. I measured carefully. Then you need to use a long serrated knife and cut all the way down through the foam. I have learned to then withdraw the knife and get the foam pieces out instead of just displacing the pieces.
The tricky part is then to feed the support bar through the slit, through the foam and line up the hole in the support bar with the base plate. Very finicky work, but doable. Once that is done, you're 95% through. Just attached the backrest to the support bar and adjust it. Done.


This is just a pic of me making a run to the Home Depot. I packed a bag of compost and a bail of peat moss on the scoot!

Ready to Disassemble:
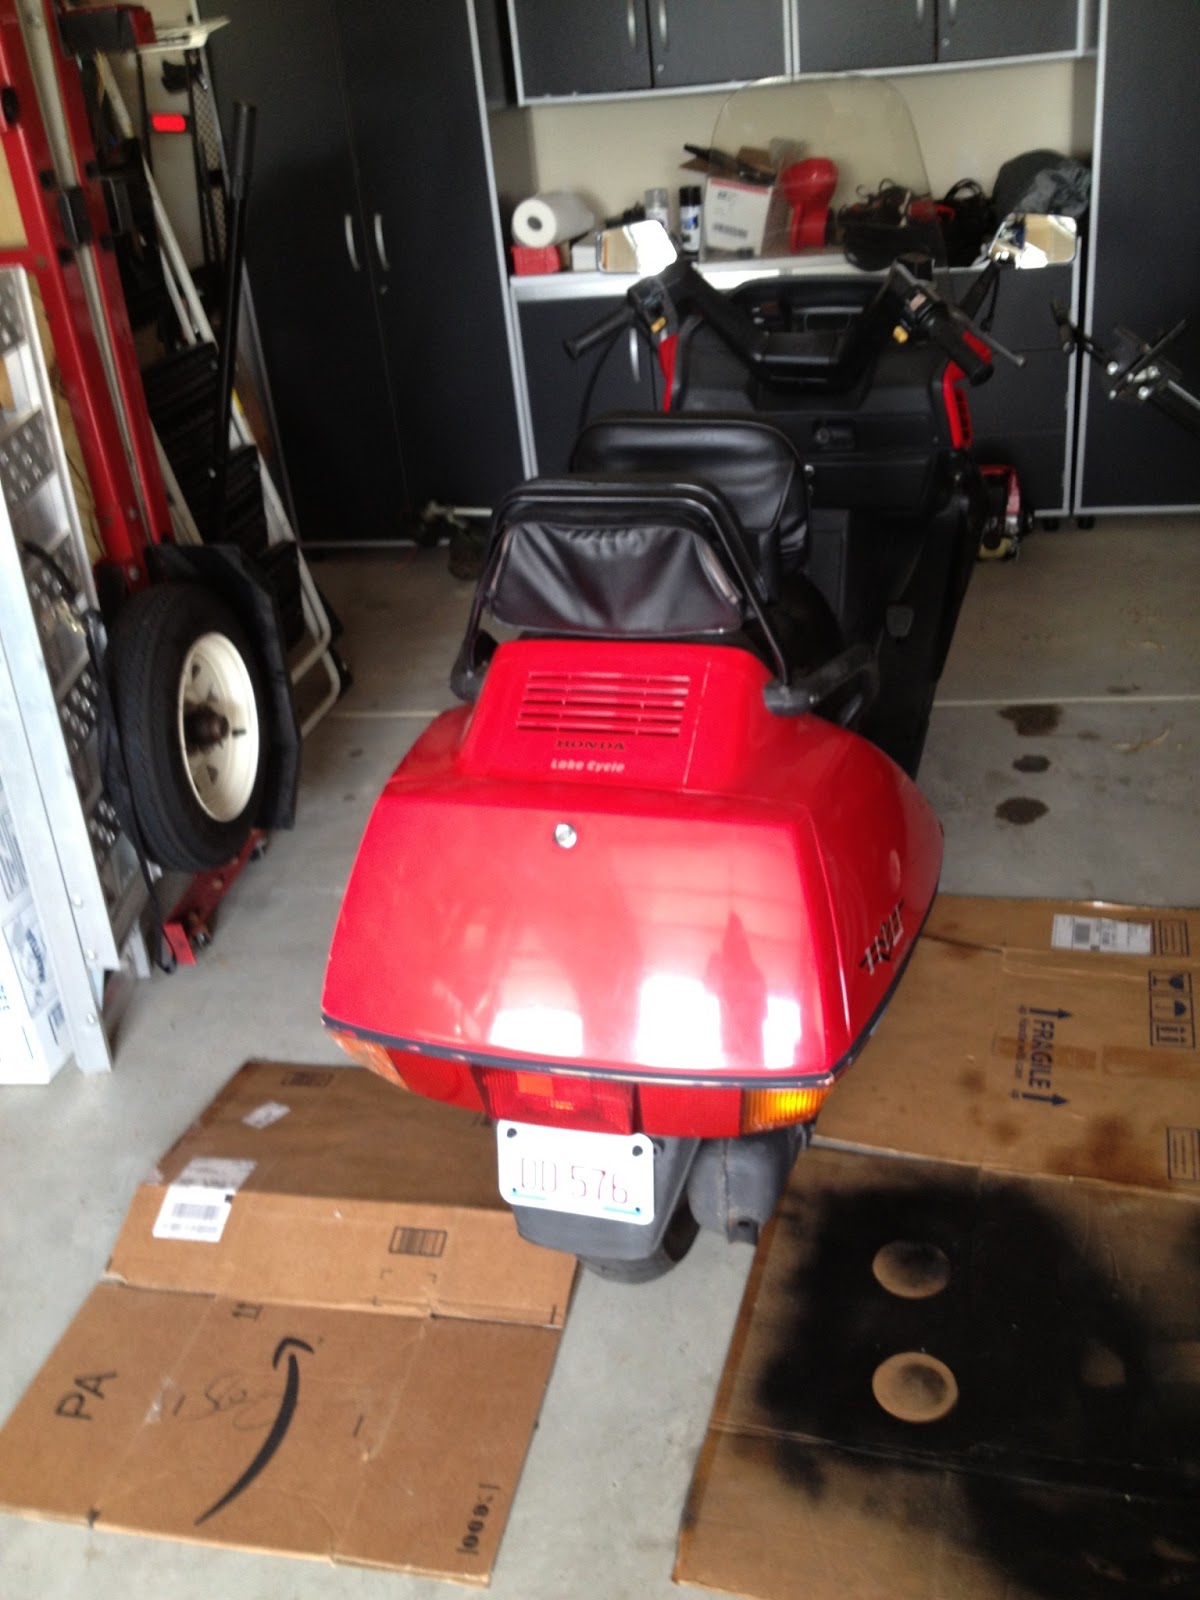
Man, I wish I had a motorcycle lift or an elevated platform to do MC maintenence on. But I don't, so I put card board around the bike/scoot to cushion my knees and have a barrier from the cement floor when lying down....which is often.
I could not find a YouTube video on how to remove all the Tupperware on the Helix, or even a step-by-step on the Yahoo user group or Helix forums. But I know old Honda's pretty well and how they come apart and re-attached (see page on the PC800 Project).
It all starts with the rubber foot mats that cover the floorboards. Pull them up (but cannot take them off yet)to reveal screws for the lower plastics:

The next order of business is to take off the tinted 'wing's that keeps air from blowing up your pant legs - and keeps rain off them as well. 6 screws hold them in - but as you may notice, mine are beat up pretty bad and some plastic screw hole grommets are broke in half. I will replace these.

The front/lower comes off with a few screws. It also holds half of the front inner wheel shroud and when you removed the other side front/lower, the inner wheel-well shroud comes out.


I am pretty fanatical about being organized when taking things apart. I lose more stuff when I don't. I bag and mark the screws, nuts, bolts and tape (don't use duct tape like I did - you end up with sticky goo when removed) them to the detached parts as they come off the bike. I plan on replacing all the lowers any way with a glossy black set I saw on EBay, but I still want to match parts with the old and keep the screws together with their respective part. I also group all taken off pieces in a safe place in the garage lest I trip, step and crash into them. That would be a very costly mistake.
The passenger footrest cover just pries off, but the metal underneath it will have to be unbolted later in order to remove the tunnel shroud.


The above pic denotes a bolt that holds the middle lower plastic on. SOOOOO, it would behoove you to remove the rear lower first, Then the bolt is exposed and comes off easily. Basically, remove from the back and move forward.
Okay, now for the rear...

It's really quite easy to remove the whole red trunk and side cover - which comes off in one unit. Remove the grab bars and passenger backrest with just four bolts. Then there are four lower bolts exposed when you removed the lower rear trim pieces.


There are two additional screws on each reflector, a total of four, but I only found one on my Helix. Oh well.


So then the rear red plastic comes off as one piece - except for the trunk lid...which is only attached by two brackets and bolts.

Oh yeah, if your Helix comes equipped with a helmet lock, the rear red assembly wont come off until you unbolt that. No big deal.
One item to note is the rear lower panel on the muffler side. It is lined with a heat tape/reflective material.....and I am concerned that the replacement non-OEM piece I will order will not duplicate that feature. One more thing to get.
Onto the front. The first thing to remove are the mirrors. Peel back the rubber boot and you see two bolts each. Those bolted mirrors loose the black plastic fairing lip which is double-sided taped down as well. Underneath that are two screws that hold the windshield in place. Remove those and the WS pops right off.


So the nose plastic comes off with a few screws. Just take your time and don't pull hard. If there is a snag, there is probably a screw somewhere. The scooter is now naked except for the black dash, handle bars and tunnel shroud. Those will come off shortly and be painted as they are very faded.
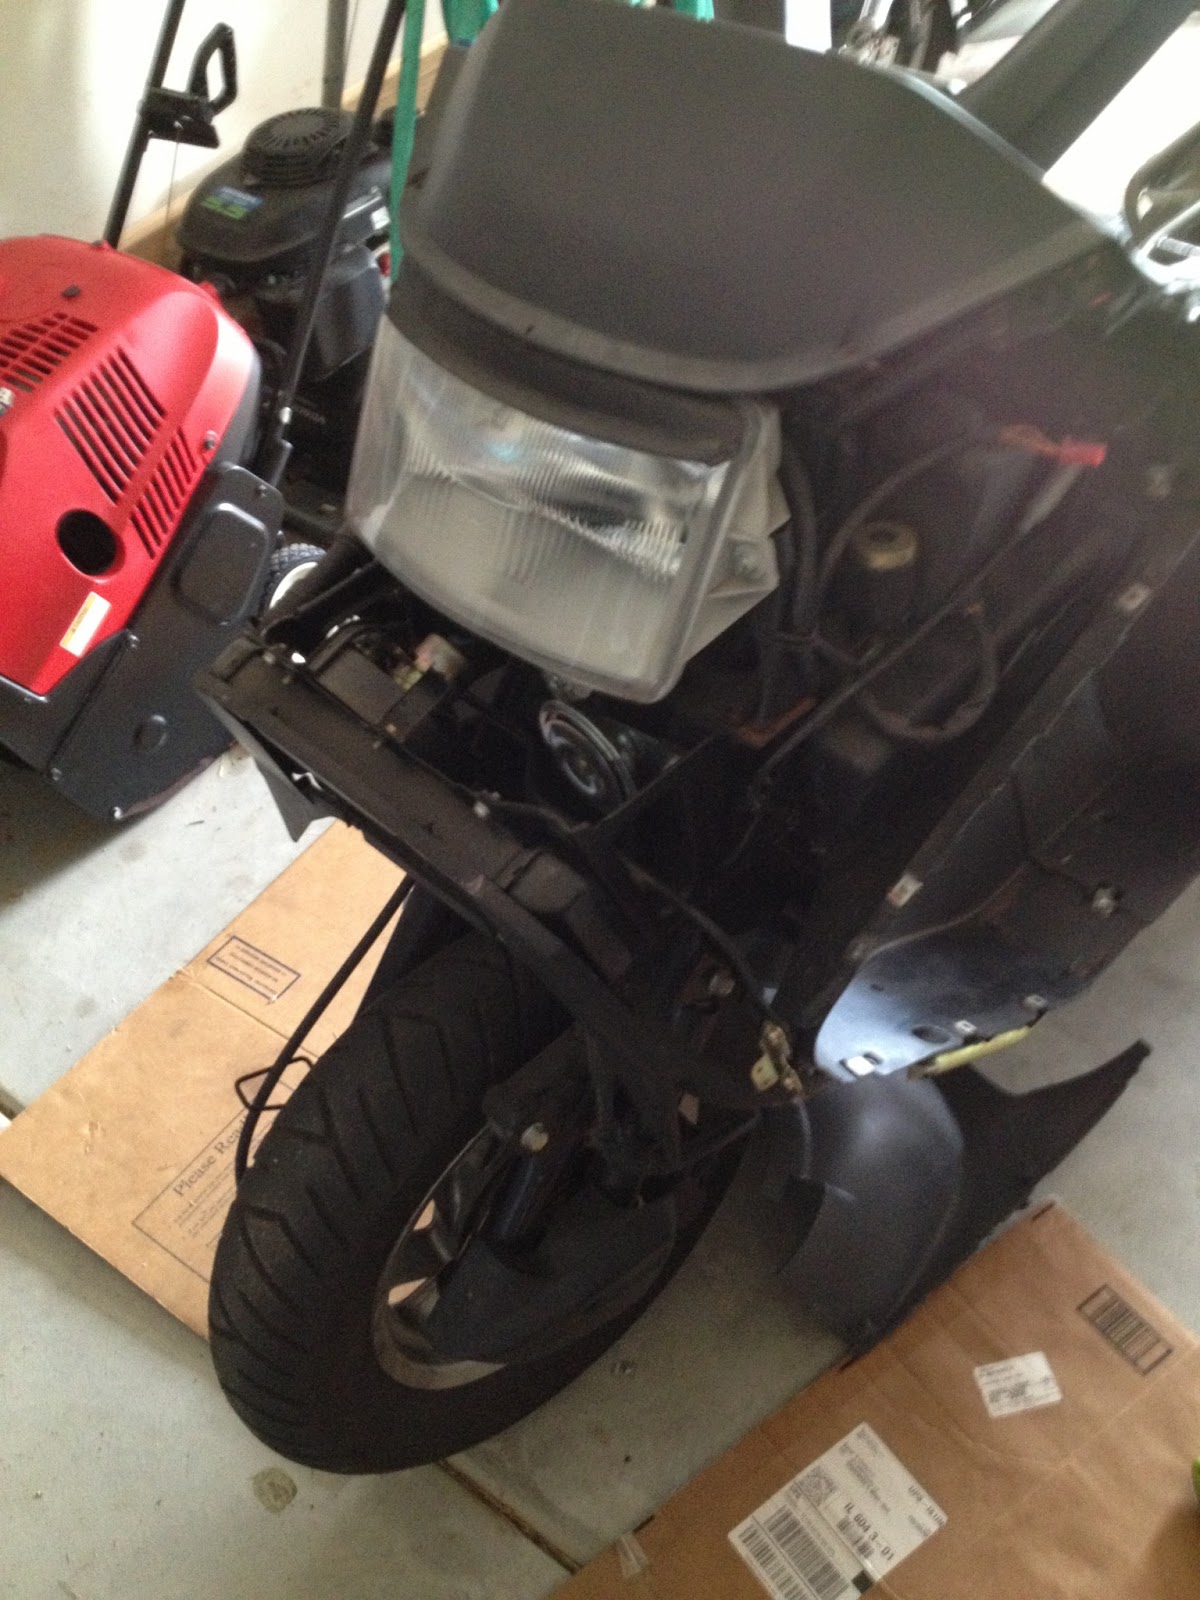


Time to remove the handlebar plastic. A few screws and the assembly comes off in two pieces...four if you include the brake reservoir cover and cover plate in the center. I started to take apart the dash when I realized I have reached that point in the project where I can make do without removing any more parts. The black plastic lower dash and tunnel shroud can be 'painted in place' with little issue.
In the purchasing process, the previous owner did say that he bought it from a 'commuter' which will, in the future, be a red flag of concern for me if purchase another one. Why? The bike is filthy under all that plastic. Not just dusty. Metal screws and bolts are rusty, the frame has surface rust in tight corners and it is generally very untidy. So this commuter must have rode the scooter to work in the rain as well....or the bike was not garaged when parked at home. That should have been obvious with the faded plastic. Lesson learned.
So, the first thing is to roll this bad boy out of the garage, cover the engine, carb and electricals, and wash this thing down in all the nooks and crannies. I will spot paint the frame as well as I go. There is enough room to slip thin paint shields behind each spot on the frame so I can - after removing any surface rust - put a coat of primer paint combo on it. I do detest an untidy engine bay.
Here, a decision was made. I was going to send those body panels out for paint and clear coat but I decided to do it myself. I never have done a finished paint project, but this seemed like a good candidate. Color-Rite is a company that specializes in paint for ABS plastic. That's important to a few reasons, one of the important ones is that they have 'flex agents' in their paint which give the paint enough elasticity to move with the constantly twisting and flexing plastic body panels. They also match paint to any model bike/scoot. So, I went to the local Honda dealer and looked at colors of bikes and took some notes. I am not married to Honda red, but I do like the a deeper red that really pops.
So, there are numerous chips and scratches that need to be sanded down and primed before painting begins. Also with Color-Rite, their primer, paint and clear coat all work with one another. It is generally good to stay in the same family of products when using a stepped process.
My time frame on this project? I was looking at 4 weeks or so. Just getting it done before July 12th when there is a plan afoot witt the scooter boys to take the scoots around the lake as mentioned.
Got a lot done today. Trying to make the most of the nice weather and roll the scoot outside to work on it. No better light than sunlight.

I decided to lift off the tunnel shroud any how since there was only a few bolts holding it on. Plus I wanted to get a look see underneath. Egads....what a dirty mess. With some exceptions (like me for instance) I have equated 'a commuting scooter', which sounds quaint and economical, with a 'work truck.' In other words, both get beat to shit. No judging, it just is what it is.
Time for another bath for this mucked up scoot. First, with no lens on the rear turn signal, I taped that up. I don't go crazy with spraying water everywhere, so I wasn't concerned this time with covering up the carb and electronics. Just some hot water, kitchen de-greasing soap and a brush and toothbrush.


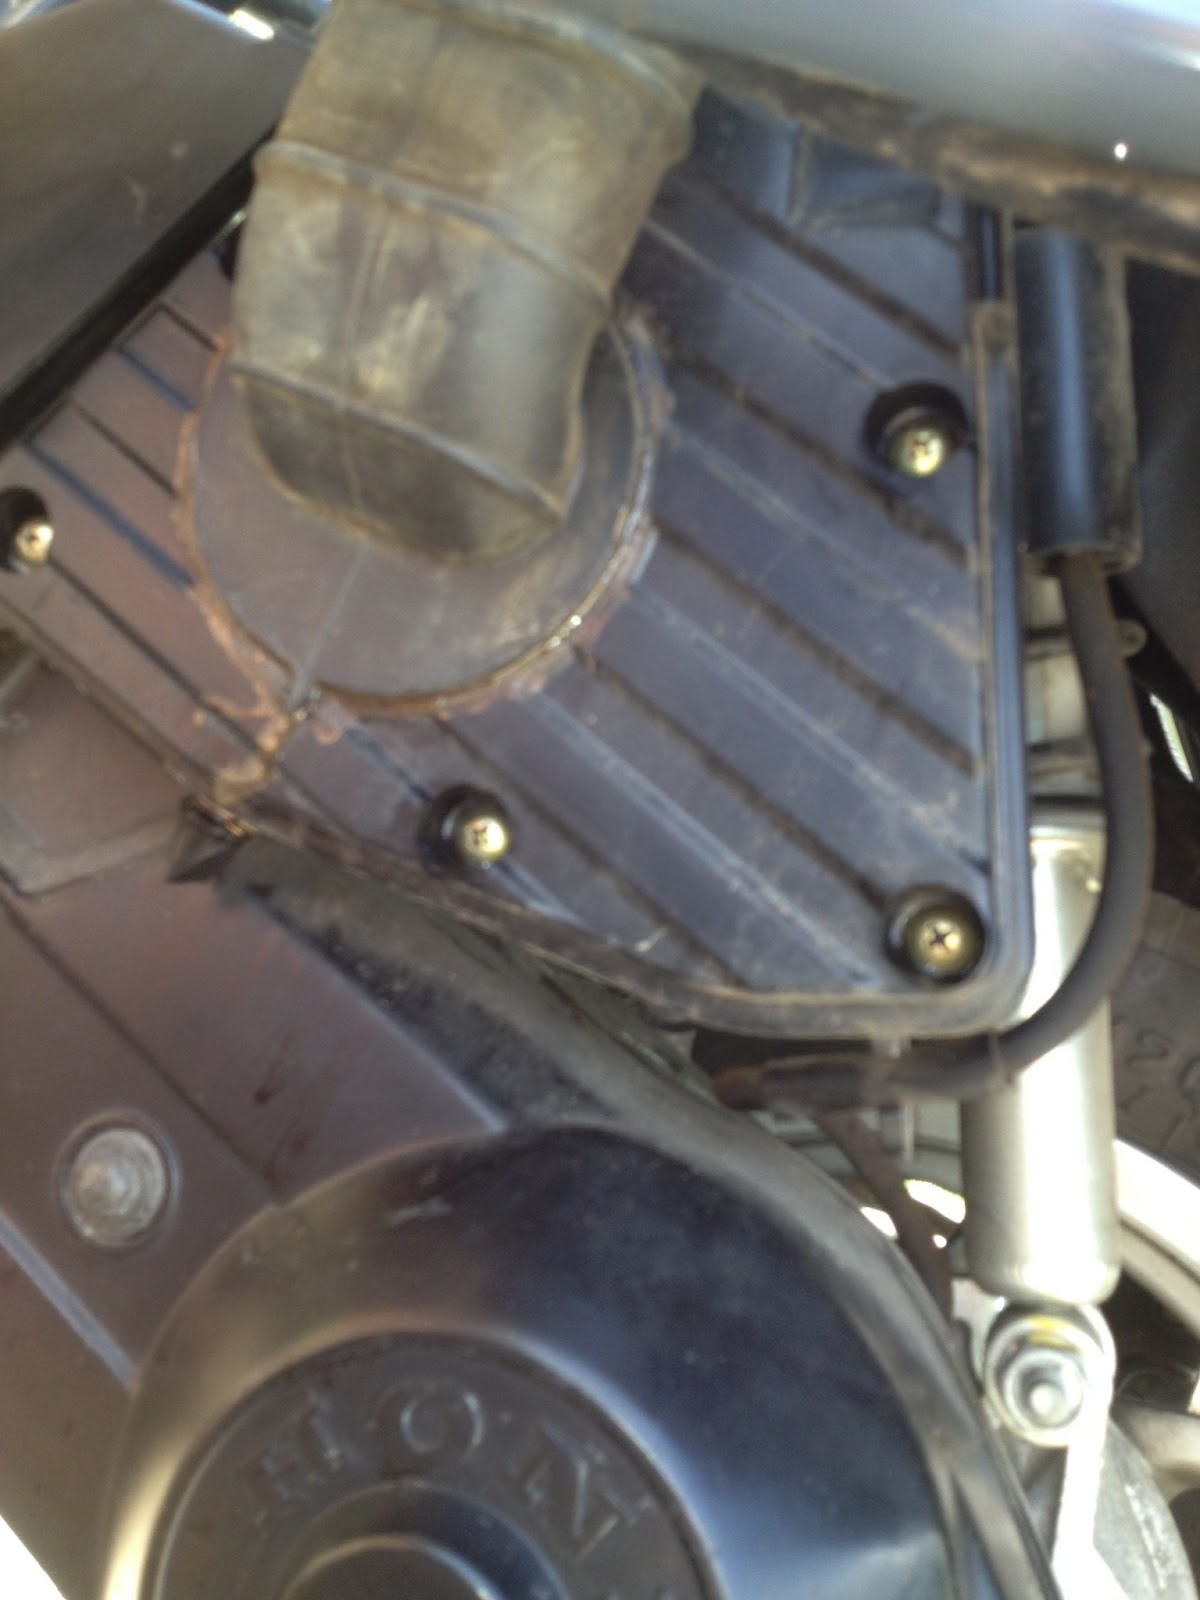
Okay, all relatively clean. Much better. Now for some mechanicals. Time to change the breather element - which is just a piece of foam.


Hey, whaddya know. No element filter. This is not that big of thing like a missing air filter would be. This breather element just is a place for escaping gases that get by the piston ring to go so pressure doesn't build. The air gases run through the element and cycle back into the carb. Viola, done. Now is the time to get all this stuff done as the plastic is off. Now, the air filter element.
A few screws and one clip, and the cover pops off. One screw holds the element in place. Here is the obligatory comparison shot:

Whoops, missing bolt here holding the air box onto the engine block. Matters not, the little bracket is going to be replaced when I put the carb brace on.

I removed the big honking white plastic resonator to give me some room to manuever. Now there is some space to check out the hard rubber intake manifold.

Next step is to remove the carburator from the intake manifold. Just a ring clamp holds that in place.


Tip here: Don't waste time removing all the hoses and connections to the carb. Just removed that ring clamp and the whole thing slips off nicely. So there is that little trouble-maker. Here's the deal with this item....and it is a design flaw. The tire and the engine sit on a swing arm that goes up and down when you ride. But you don't want the carb to bang around that much, so they attached the carb to the engine via that stocky rubber intake manifold. it isolates the carb from some of the shock. So the carb is basically free floating and moves around, and when the rubber intake manifold ages and develops some dry rot, it will start to crack. When I depress the carb end of the manifold - basically stretching a bit - sure enough, there are some small fissures. They don't go all the way through as yet - which is good. Air allowed in through any cracks would make the engine run lean - which means hot. This is how exhaust valves get burned up and toast an engine over time.
Two allen bolts hold it in and it comes off easy. Here is the offending unit:

I put on the new one - and the little ring gasket - and we are doing good. I sprayed down the outside of the carb with carb cleaner and it looks good again. I am not going to put on the resonator again until I put on the new carb brace, but I am missing some bolts so I have to wait for them to come in. On a related note, Honda corrected this on their 2004 and newer models and the carb brace is already on.
I wasn't liking the look of the belly pan as well, so I removed that and will re-paint it.

I pounded out a few of the bigger dents and sanded out some surface rust out. A few coats of 'Hammered Silver" Rust-o-Leum and we are good to go.

Since I am waiting for parts, I will start addressing some surface spots of rust on the parts of the frame I can see and access. I am sanding through them - and lightly roughing up the surrounding surface - in prep for primer. Most of the rust is at the welded joints, but a wire wheel on my drill makes short work of it.
Okay, I think it's day 5 or so in this project.
Time to do some cosmetic work. First off, the belly pan turned out great and I re-installed it.
That is when this happened:

Mr. Happy Ratchet just kept on cranking on the nut and SNAP! Mother@#&%@#&!! Okay, that point of attachment is toast. No way to re-affix a threaded post. The other three nuts went on fine and it seems pretty sturdy. If I feel it shaking or getting loose, the only thing I can think of is to JB Weld the hole in the pan where that post it to the remaining post nub. That would be a permanent fix though and to then remove the pan, you would have to grind the weld off. We will see....
Okay, shake it off......
Time to take care of those rust spots on the parts of the frame that are visible under the seat, under the trunk and under the tunnel shroud. I already sanded the rust and wiped the area clean. So, I taped things off and shot some primer.


I did some running around to find some Krylon Fusion glossy black for the black parts, and finally, ACE Hardware had only two left. Now time to shoot the frame with grey paint. Some wires got a bit of overspray, but I am happy with the result.

Time to prep the black plastic left on the scoot and the taken off pieces. I already washed them with hot, soapy water. They are severely faded and the surface is smooth, so I read that you should lightly abrade the surface to form some 'tooth' so the pain will stick. Okay. I used some well-used 600 grit sand paper and scuffed it up. That was a mistake....


I thought perhaps that the 3 coats of paint will fill in the tiny scratches - and for the most part, it did - but in some spots, you could see the scratches. Next time - with severely faded plastic - I am going to just use primer. I could re-sand with 1000 grit, but it's good enough for me. But, on the handlebar plastic, I skipped the sanding part and just wiped with alcohol. Much better.
I am glad this happened because I am getting closer to shooting actual color on the red parts and am anxious as I have never done that before.
I figured I would change the gear/final drive oil today as well, but I am kind of stuck. I can't get the belt cover off even after removing the several bolts. I did some reading and sometimes they do get stuck on the dowel guide pins, and it is recommended to tap it all the way around with a rubber mallet. Okay, that will have to be tomorrow mornings project after church.
Looking underneath the aluminum belt cover I noticed a severe scuff. That, combined with the cracked lower plastic and I am wondering if some knucklehead owner previous ran this thing off road.
Still waiting on parts to complete the carb brace. I was rolling the scoot out of the garage and noticed some screws that I apparently failed to bag and attached to their requisite part. Ugh....I hate that. Also, I just found a rubber grommet I ordered before but misplaced, ordered a new one and then found the original one. I can't emphasize enough to create organized, specific spaces for 1. removed parts, 2. Incoming new parts 3. tools 4. completed parts waiting to be put back on. I have taken over another section of the garage to spread these spaces out. Tired of tripping over myself.
Okay, Day 6:
Not a lot of time to work on the scoot today. Went to Mass and doing things with wife - but she granted me time to accomplish the one task I had, scooter wise. The final drive/gear oil.
But before that, a fresh look at that tunnel shroud and I was getting less and less happy with the outcome of that painted piece. Screw it. I shot a couple coats of primer on it and will start the paint process over. It can't look any worse than it already does.

Never did a gear oil change on a Helix, but I know the essentials. You have to take the left-side transmission cover off to do this. Two long, rubber-gasketed bolts on the cover itself, but then two smaller bolts; one below the cover holding a rear brake line, and the other to the front of the cover holding a vent tube. Both are just little brackets. I have read much that you need to remove the airbox, but you really don't have to.
That said, this thing was not coming off without some persuasion. Enter, rubber mallet. Tap it gently around the entire case to break the seal. When that doesn't work, go back and whale on it all around the aluminum cover. Besides the rubber gasket there are two guide pins that can rust and make it whole thing stick.
Okay, that did the trick and the cover is off.

Wow, as I said, that cover looks pretty beat up. I cleaned it thoroughly with hot soapy water, dried it, and shot a coat of glossy black on it. Better. Oh, and that while spot is not a camera flash. It is that severe scrape I referred to earlier. Nasty.


Above is the gasket - which is pretty beat up as well. It will do for now and I may order a new one with the next batch of small part orders. I need to consolidate my ordering to save shipping costs. It is an important gasket, but not essential. It doesn't prevent fluid or form a vacuum. It just prevents gunk from getting into the drive-belt case...which is a good thing.
The other part is a ring clamp for the lower airbox opening where it fits into the transmission cover that I just removed. It had no screw on it, was rusty and was inoperative. I left it off as it was doing no good to begin with. I can and will ride it without the clamp but I will add that to the next order. The other circle part is a rubber band of some sort. It was just loose in the cover when I removed it. Hmmm. I looked and looked and couldn't see where it might have fit. I checked the microfische at RonAyers.com - where I get my OEM parts - and couldn't see a part like this on their exploded views. Why am I getting nervous that this is going to bite me later?

On to the gear oil change. That drain bolt was playing possum as just another one of a few mounting screws. I had to check the service manual I found on-line to make sure. So, remove the upper check/filler bolt - and you get some seepage - and open the drain bolt and let it flow.
Put the drain bolt (don't forget the crush washer) back it and pour in the new stuff until it starts seeping out the check bolt opening. I don't debate which oil to use....I just go with Mobil1 75W90 Synthetic. Done.

This is one of those guide pins I was referring to. This one has a bit of rust, so I sanded it lightly and put a very light coat of white lithium grease on both of them. This should allow getting it off much easier next time.
That's it for today! Next on the agenda? Well, still waiting on parts to complete the mechanicals. But I will order the red paint tomorrow and can start prepping those panels, Also, I want to further disassemble the passenger backrest and remove the rust and paint that as well.
I did get some heavy - paint sag in the corners of the dash where I should have been a bit more light with the coats. Lesson learned. I could always go back and sand it off and starts over if I can't live with it. We will see.
Day 7:
So, I did get a couple of things done last night. I broke the passenger backrest down, took it downstairs to my wire wheel machine and removed the considerable rust in the corners. Primed and then painted glossy black.


I will be modifying this piece later when I add a luggage rack to it. But for now, it is painted and in the 'ready to be installed' pile.
I also took the red panels and disassembled all of those.

Today, I am going to order the paint. This will not be cheap at $33 per 11oz can, plus primer, plus degreaser, plus clear coat. I could have gone with Krylon Fushion paint at $6 a can, but colors are few and I want it done right. I will further prep the panels today; removed the stickers (am I going to replace the Helix sticker?) and wash them down.
Also, as stated, I am using the 'Color Rite' family of products, and on their website, there are some instructional vids. They didn't use Bondo on chips or deep scratches. They just sanded them down. Hmmm. I will have to ask them about that when I place my order. I would prefer to NOT use Bondo as I do not know if it will 'flex' enough for the plastic.
BTW, the sagging paint on the dash corners look horrible. That will need to be corrected. Lesson learned: Use lighter coats and paint in the sunlight. Problem is, it is always so frikking windy by me. Whatever, I will roll the scoot if I have to to the other side of the house.
Day 8:
Well, got the lower panels in the mail today that I bought on EBay and, overall, I am pleased with them. They are such a smooth, glossy black and look like they will scratch easily. I am considering putting a coat of clear on them before attaching. I don't find them 'flimsier' than the OEM parts as reported on some sites. I guess I am impressed since they are essentially pattern parts, I expected that tabs and holes won't match. The only area I had to modify were on the rear panels where the reflectors get screwed into. I had to use a file and widen the opening just a bit to make them fit better. Now, it may be a whole other story when installing, but I am hoping for the best.


Above is a comparison of the OEM and EBay part - inside view.

The glossy black part has a mirror finish that I feel will scratch easily. I wish I knew if I could put a clear coat on it without a problem. I think it should be okay if I clean it well and wipe it down.

As you can see, the reflector just doesn't quite fit. A little massaging with a straight file made it fit like a glove.
Well, I ordered the primer, paint and degreaser from Color-Rite. I considered again just going cheap and using Krylon Fusion, but read to many conflicting stories on the outcome. I had my color picked, but then I saw a picture of a Ducati on the website of Color-Rite and I changed my mind. It was the deep red I was looking for.
Now, to start working on the red panels. The tech guy at Colo-Rite said not to use Bondo - just sand down the chip or scratch, so that's what I did. Much easier that way.


I used 220 grit to get the chips and scratches out. Then I use some 320 grit I had lying around to reduce those scratches and remove the shine from the rest of the panel. I should be finished with the prep work by the time the paint gets here. I hope so anyhow. I hope to have finished panels by - not this weekend - but the next.
By then my other ordered should have arrived and I can star buttoning up this project. Yeh!
Day 9 ish:
Ug....I wish I had more time to work on this. Any how, I am in the process of sanding all the red panels. I was going to originally remove the Helix stickers from the rear panels, bur they were not really coming off - even with GooGone. So, I decided to just leave them and tape over them. I will apply the paint, then remove the tape, and clear coat everything together.

So, I sanded all the panels. Some vids say to use 600 grit to remove deep scratches, gouges and chips. Yeah....that would have taken four days to get through each panel. I used 220 grit to sand out the scratches, gouges and chips, then 320 grit to removed the sanding scratches from the 220 grit. Then I used 600 grit and 1000 grit over all areas to remove any shiny areas.
One other benefit from using aggressive grit on those trouble spots was that you didn't have to press down so hard when sanding. This is important because the panels are usually resting on the fragile plastic tabs when you are sanding. The last thing you want to do is to break one of those.
The trunk lid is the last piece to sand and.........trouble. I can't believe I didn't notice this on my pre-purchase inspection. There is a crack in the right, lower corner.

This is a set back. I have seen videos on Youtube on how to mend this and I would love to take a whack at that. But not this time. I went on EBay and found a 1998 Helix trunk lid for $60. There is just one scuff on it - which is fine - because it is going to be sanded and re-painted any how. I will just switch out the key cylinder on the cracked one so I only need one key.
I am still waiting on parts...which is pissing me off a bit to be frank. But, I still have some stuff to do that can be done. I will sand, prime and paint the metal passenger footrests which divided the floorboards. They are covered by a rubber boot so you can't see them, but there is a bit of rust forming, so this is a good time to make them shine like new again.
I also want to shoot a clear coat on the new glossy black lowers. I will do this on a small test piece first to make sure it works.
I also need to sand a couple of paint-sag area on the dash and re-paint those. I want to also paint the Honda trim piece that holds the windshield on. It is pretty faded and I want to renew that as well.
However, the wife and I are going away for the weekend so no scooter work. Ug.
Day 10 ish:
Wow, it has been a few days. I realize you are on the edge of your seats. Let me catch you up. The little joys in life is finding boxes on your doorstep. I have received stuff. The Cee Bailey windshield came in. Nice. The EBay trunk lid arrived and was as advertised.
First things first. Let square away that carburetor brace that has been dogging me since day one.

I received the longer screws required to mount the bracket. It went on fine. The 5mm bolt I ordered (from 2007 Helix micro-fiche OEM spec sheet mind you) was still too short to accommodate the new bracket and the resonator. I am tired of dicking around and waiting for OEM parts. Hello Ace Hardware. Couldn't find a bolt, but a found a stainless steel 5mm screw that was long enough and seemed to fill the bill nicely. Done.
Since I am stalling because I am nervous about painting the panels, lets tackle that rusting muffler. Aside from the cracking intake manifold, the muffler is the next weakest link on the Helix IMHO. These things rust out and fail.
Mine only has surface rust thank goodness.

There is bit more rust underneath, but it is all surface rust. I wire-wheeled the spots then painted with a high temp (2000 degree) flat black paint that I had laying around from the last project bike. Voila!

I wanted to remove the rust from the exhaust pipe near the gasket, but that will wait for another day. There is also light surface rust on the engine block. The commuter owner must have rid this thing in the rain. The oil line and banjo bolt feeding the engine was also starting to show signs of rust, so I did sand that off which will buy me years.

There is no sense taking care of these rusty bits now. You need to remove these parts when you replace the rear tire, so when that time comes, I will repair or replace all these bits because you have to replace two exhaust gaskets anyhow when you put the exhaust pipe back together. I do prefer a scooter design that doesn't require a muffler removal to gain access to the rear tire - but the Helix is not one of those models.
I am waiting on a new gas filter, but there is no getting around the fact that I must now start the painting process.
I received all the paint, primer and degreaser from Color-Rite. I also purchased tack cloths, 600 and 1000 grit sand paper. All the panels are ready to go besides the new trunk lid I just received. I sanded the little - but deep - chip, wiped then all down and now am ready to start the process.
Here is shot of the new trunk lid repaired:

Here we go.......
First thing I did was to watch the instructional video on the companies website again and take notes.
Time to degrease all the panels. Wearing rubber gloves, I used a toothbrush to get into the creases and tabe where I saw dirt in the corner. Wipe in one direction.
I decided to make a painting station in my basement since the only way I could get good light in the garage was to open the doors - which let all the wind in.....which is not good for spraying or clean drying.

Covered the bench with cardboard and put a box fan in the window to suck the fumes out.
Time to tack cloth to get any lint or fine particles removed.

These are all the panels before painting.

This is my staging area for non-painted parts.

These are the pieces primed. Two coats of primer. Only use the tack cloth between products - not between coats. Wait 10 minutes between coats. With two coats, they look uniform and ready for color.

This is my color choice. The Ducati red sure pops and I saw one this last weekend in Galena which just re-affirmed my color choice.

This is after two coats of paint. It obviously goes on wet and you get that deep, red shine. But it dries dull and lifeless. Wait at least 30 minutes between coats. Tack before clear is applied.
This is the finished product - and pics does it no justice.

The panels came out better than I expected. With the clear coat, I only ran into one issue. On the very last panel, two drips came off the nozzle of the can and landed on the panel. I ran out of expletives at the time.
Never try to fix it while wet. You only worsen the damage. Let it dry - and if its still a problem you can sand it out.
The other thing I noticed is that the shine is uneven.....which is expected The light hits the panel and the uneven coats of clear make the light bounce funny. Well, I plan to use polishing compound once the paint cures to even out the clear followed by polish to really make it pop.
No more than two coats of clear are recommend or the color may not cure correctly.
So, the panels will take about 5 days to really cure. That's fine because I am still waiting for the OEM gas filter to arrive.
After that, it is assembly time. I hope I can remember how this goes back together.......
Day - I lost count. It's been a total of about 3 weeks though.
My scooter trip around Lake Michigan got cancelled, so that bought me more time. Which, as it turns out, I will need. Much has happened so let me catch you up.
As I said, I am happy with the paint job in general, but less happy with the application of the clear coat. When I shot the color, the rattle can nozzle is designed to emit a fan pattern which - is not only easy on your finger - but resists any concentrated burst to any one area. Not so with the can of clear coat. It has a normal nozzle and it is easy to spray too much on.
I moved the now finished panels to the garage to let cure. Although dry to the touch, it will take 5 days to actually cure. The finish is dull - but I anticipated that. I called Color-Rite technical services and they cautioned not to apply anymore coats of clear than the two I already applied. They said it can turn 'milky' if you do. It is best to use a fine cut polishing compound to make it pop.
With indirect sunlight coming in to the garage, I know see many more clear coat drips. Not a happy camper as I will have to polish those down and out.


The first pic above shows a clear coat drip. The second pic shows a clear coat 'sag.' Ug.
Also, the pic below shows why I think the finish is dull. There is a 'orange peel' effect which muddles a shine associated with a pure flat texture. The polishing will correct all of these.

I bought his stuff to polish it out. It worked okay and produced a shine.

On the pic above, I used the product on the lower portion of the piece. You can see the difference between the upper and lower section. That took a lot of elbow grease and way too much time for a mediocre result. The drips and sags will take forever at this rate.
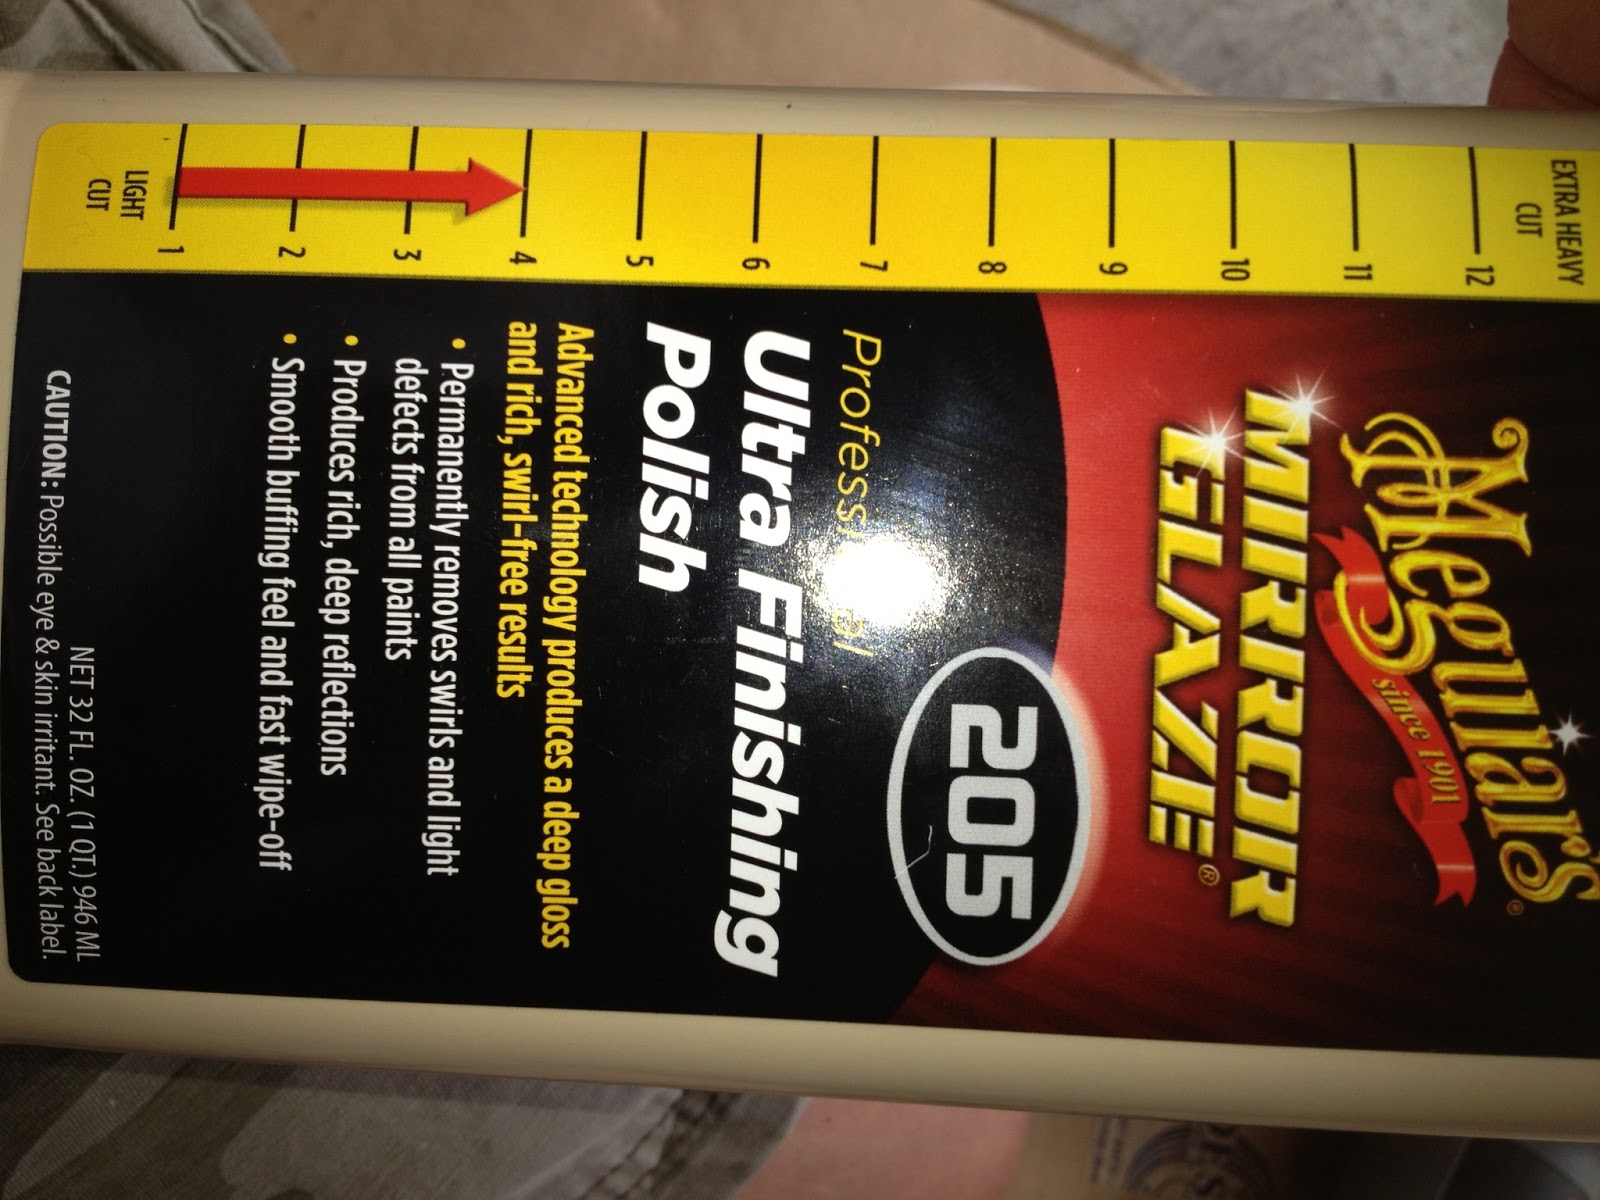
My friend Rich recommended Mequires 205 and then 105 polishing cut compound using a random orbital polisher. So, I am waiting for those products to arrive (thank you Amazon Prime). Until then, I can do a few minor things plus a little bit of assembly. Yea!
*Note: After crawling around the concrete floor during this project, I have decided to put a Harbor Freight Motorcycle Lift Table on the wish list. I do too many of these scooter/bike projects for this old boy to be laying on a concrete floor.

The black trim on the lower end of the trunk lid needs to be painted. Covered the red part, shot some glossy black then clear. Done.

If you remember, I bought the scoot with a broken left turn signal lens. Time to replace that. To get to it, you have to first remove the one screw from the red lens adjacent to the turn signal lens. Pop off the red lens which reveals the hidden screw that attaches the turn signal lens.

There is a gasket that surrounds the lens and fits into a channel around the circumference of the lens. I ordered one and it fit nice - but there was no way the lens tabs would fit into their allotted slots with the gasket in its channel. I finally just removed the gasket and installed the lens. There was no gasket when I removed the broken lens and - and this is where Honda design is genius - the parts overlap each like roof shingles, which will shed the water. I will take the chance.
Time to replace the gas filter. Why? There was no problem with the old one, but it is 15 years old and I have it in plain slight. Let's give it a new birth - fuel system wise. For small hose clamps, Honda uses those wire clamps which work fine. However, they are a pain to remove for me and my needle-nose pliers. I destroyed them in the process. Fine, I hate those things anyway. I replaced them with some small hose clamps I had in the garage.
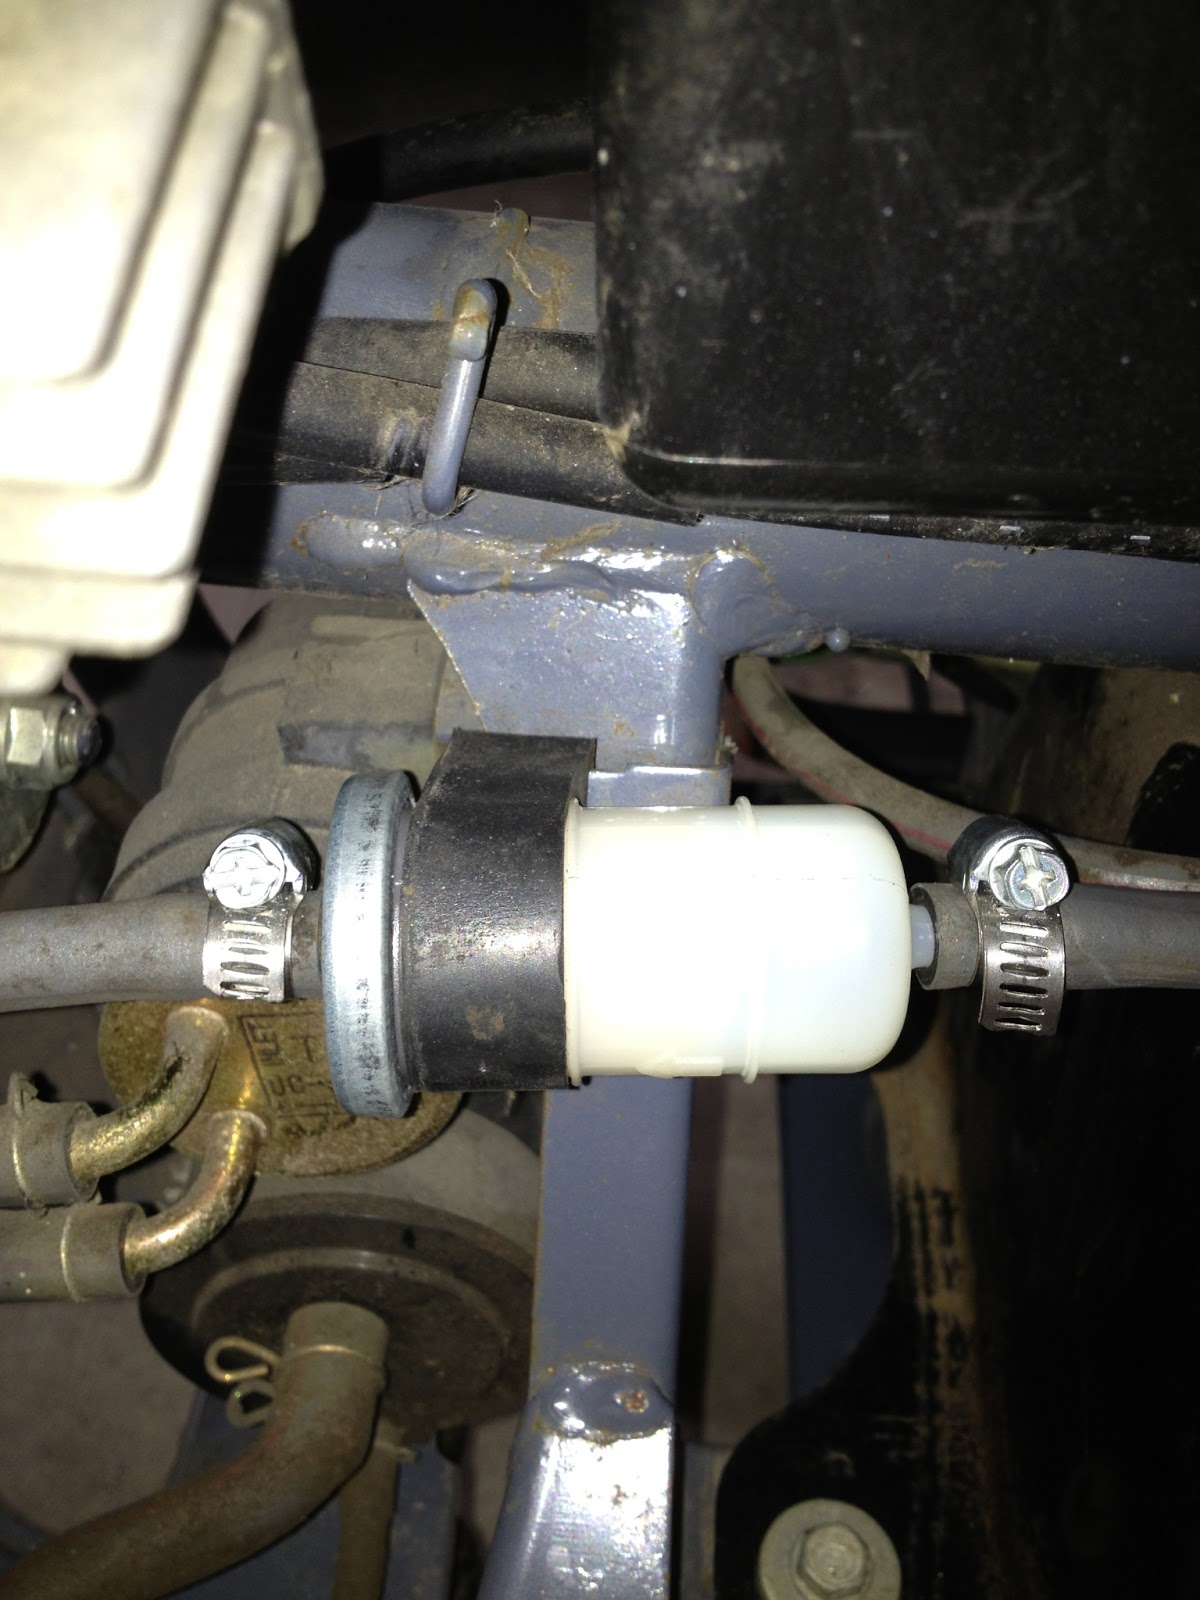
Re-use the rubber hanger from the old filter though, which fits on a metal bracket and holds the filter snuggly.
I removed, painted and clear coated the rotor covers on each side of the front tire. They were as faded as the rest of the plastic.


Much nicer.
I don't think polishing the panels off the scoot would be a good idea. They are flimsy and I am afraid any pressure on them will crack a piece. So, let's put them back on the scoot.
Here's a god tip on re-assembly of the Helix. Think in terms of 'sub-assemblies.' Meaning, don't just start bolting panels back on in the order you remember taking them off. I didn't take pictures of it, but I found there are 3 main sub-assemblies you need to put together first, then attach the sub-assembly on the scoot. `
The first is the trunk assembly - consisting of two rear, side panels (with the Helix logos on them) and one small vent piece (with a Honda emblem on it) which connect the two side pieces. IF YOU PUT ON THE SIDES, YOU WONT BE ABLE TO ATTACH THE CENTER, VENT PIECE. It must be done off the scoot because the small vent piece gets screwed on from underneath. Then you just attach the whole sub-assembly as one piece.
The second sub-assembly are the two front panels (that house the turn signals) and the large vented center panel which is beneath the headlight. That one I do have a pic of:

This is the underside of the front sub-assembly. You see how the center panel gets attached with screws from underneath?
This is also a smart way to go because, individually, these panels are pretty flimsy. Screwed together though, they....well, they are still flimsy ...but a stronger type of flimsy.

This is that same sub-assembly as you would see it on the scoot. The three panels are attached by screws underneath.
The last sub-assembly is the three-piece lowers on the front end. They are either black or grey depending on the year of your Helix. Assemble the three pieces: left front, right front and the small, center, vented nose piece before you install it on the scoot.

Again, and for the same reason, the center.vented piece is screwed on from underneath and you will not have access to them if you put on the pieces individually.
Honda plastic design is something to behold. You will notice in the naked pics of the Helix that the front end stops at the radiator. The frame does not extend past that point, but the actually nose of the Helix is much longer. I put on one side,front panel to show you how far the plastic extends forward without the support of being attached to the frame:

A bad angle for depth, but the nose sits out very far from the frame. So, how does it get supported? Think of it as a 'unibody' construction. The different plastic panels get attached to each other support themselves.
Case in point, I now have the front lower sub-assembly attached. It gets screwed into the red panels an into the black tunnel housing.


There you are, Attached. I think the glossy black lower trim looks nice. When the red pops from the polishing, it will really scream. Remember, these glossy black lowers were Chinese parts I got on EBAY for $150. They are going on pretty well. Sometimes the holes don't line up perfectly, so I use a rounded fine file and just enlarge the hole a bit.
Now, these two pieces comprise the front wheel well. They screw onto the black lowers.

On last thing to do today was find a bolt for the air cleaner box to attached to the carb brace piece I installed earlier. Remember, there was no bolt there before the box was just hanging there. Done.
Day - oh who am I kidding - Week 5:
The body work continues....and continues to frustrate. I gave up on an artificial time to completion. I will finish it precisely when it is done.
So, where are we? I ordered some polishing compounds and pads to use with my random orbital polisher in an effort to remove the dull, orange-peel surface. The flatter a surface is, the greater the shine. My orange-peel surface I believe is caused by the high humidity in the Chicago area when I applied the paint and clear coat. It has been unseasonably rainy and humid here - but it is what it is. What I believe happens is that when you spray in humid conditions, the moisture in the air gets trapped in the finish and causes minute bumps - ala orange peel.

I will start our with the least abrasive compound (205)and see if that works to get the shine to pop and also to remove those stubborn clear coat drips.

Well, no go. So I upped the cutting abrasive to the 105 and took a shot with that.
Well........still a no go. Those drip marks aren't budging. Okay, let's try lightly wet sanding those drips with 1000 grit sandpaper.

Well, that is working! Finally, some progress. You can see the white stuff on the sandpaper. That's the clear coat. If red appeared on the paper, you are sanding into the paint. Bad move.
So, I sanded the drips out to the level of the clear coat. I then used the polishing sequence again.

Well, that's more like it! Tough to see here, but I noticed that the area I wet sanded was glass smooth compared to the still orange-peel surface where I didn't sand. Okay, lets try wet sanding all the panels.

I can tell it is working. I can feel the difference while sanding. The sanded areas feel like glass compared to the unsanded areas.
This is what it looks likes before I washed it after the wet sanding process.
Washed, the paint is now flat - both in appearance and to the touch.


Okay, now to start the polishing process over again and let's see what I get.
Well, it looks good, but I see some ever so minor orange peel and wondered if I wet-sanded again, even lighter, I can get it smoother still.

.....and I did. Right through the clear coat, paint into the plastic. Ug. I just had to laugh and had to remember the adage, "The enemy of the better is the best." I had a good shine going and blew it chasing perfection. Lesson learned.
This will set me back some.


I am going to see if I can just spot paint these two areas. Primer shot and now waiting for that to dry. If it doesn't work, I will removed the panel and start from scratch. Including drying time, this puts me back another week.
While the front panels are in stasis, I polished out the rear panels and they look great.
Week Whatever........
Perhaps 'great' was a stretch regarding the looks of the paint. It's passable - but I was going for showroom finish. Honestly, next time I will do all the prep work and primer but have color and clear shot at some body shop and be done with it.
(That said, I used the Meguires 105 and 205 polishing compounds on my 3 cars and it really made the color pop!)
So, while the front re-painted panels cures, time to handle some other bits.
On my list is replacing the brake fluid which looks old and darker than it should. Also, since I have no knowledge of its last change, it it time. I decided to make life a bit easier this time around and purchased a brake bleeder kit from Harbor Freight. Here is a picture of the set up:

Easy enough to set up. Just put one end of the hose on the caliper bleeder valve, the other end on the pump and inbetween there is a cup to catch the old stuff. There is a video on Youtube on this which was helpful. This does two things: It allows just one person to bleed the brakes and there is less chance of air getting into the line.

So, after surgically draping the area around the brake reservoir off, top off the reservoir off with fresh Honda brand brake fluid. Don't use the old, open can of brake fluid you have stored on the garage shelf. Get new stuff every time even if you don't use all of it. It matters.
So, all topped off, you pump (not over 20 on the gauge) causing a vacuum, then just slightly open the bleeder valve, which draws the fluid out. This is not a fast process. Right before the gauge reads zero and there is still some vacuum pressure left in the lines, you close the bleeder valve ensuring no air go back into the brake line. That is the cycle. Now repeat. About every three cycles, I check the reservoir and top it of if needed. It took about 25 of those cycle to replace the old stuff with the new stuff.

As you can see, the old stuff is like a pale cola-colored. New stuff is clear. Job done.
Next, while screwing in the plastic piece that surrounds the brake reservoir, the screw snapped off. Ug.


Well this is a pickle. I got out my handy set of screw extractors - that have served me well in the past - but they did not work because the screw was so narrow. Finally, I just drilled it out.

I then ventured down to my local Ace Hardware and got a self-starting machine screw (not self-tapping) which has a thread cutter on the tip that will cut a new thread while you screw it in. Bingo......worked like a charm. Although it is a standard slot, I will put a dollup of black paint on it and call it done.....none the wiser.
Let's see what other mischief I can get into. Ah, the integral passenger backrest. Remember that rear sub-assembly I went on about? Well, before you attach that assembly (like I did) remember to put the 3 bolt backrest on.


I want to work on the side stand and center stand as they have a bit of rust on them - especially in the welds.
I can reach all of the side stand while still attached to the scoot. The wire wheel on the drill works fine for this task.

I removed the center stand - which is easy. One cotter pin holds the thing on. Remove that and the spring, slide the enormous pin out and the whole thing drops. I took this piece to the stationary wire wheel/grinder in the basement to work on that.
Before:

After:

It took 30 minutes to get in all the crevices and many welds, but it got it down to the shiny metal.


Wiped it down with alcohol and shot it with primer. Will wait 24 hours to paint.

Remember how I said "one day I will get a motorcycle lift table..." Well, Harbor Freight had them on sale. Boom........got it.

It just makes life easier, and now I can see much more and took care of some other slightly rusty parts and lines.
Tomorrow the panels will have cured and I can polish them out and then do some more assembly. The end is in sight.......
Week 6: Project Done

Center stand turned out great. I used water-proof grease to re-grease the center stand sliding pin, and re-installed the center stand.
Okay, the paint on the re-painted fender has cured. I used the same polishing steps with the Meguires products and it turned out.....okay. Not showroom perfect. More on that in my end comments.
Time for re-assembly. I installed the new Cee Bailey windshield - which is just two screws near the center. I used double-side tape to install the Honda liner that covers the lowest end of the windshield. That holds it in place while you fiddle with bolting down the mirrors which hold the liner in and adds to the securing of the windshield.
Now for the rest of the lowers. There is a chronology to installing the lowers, and I had to back track a few times and un-install, then re-install. No big deal. I started with the tinted 'wings - which weren't lining up exactly as I would have liked. I opened up the holes on those a bit with a drill bit and it went well.
In removing the lower plastic, you start from the back and work forward. Now its the opposite for re-installing. Before that though, you need to lay down the rubber floor board and bolt on the passenger footrest because once the lowers are on, you won't be able to bolt that piece on. Now start installing the lowers until you get all the way to the rear.
Finished.
Here are the results:


Final thoughts:
I like this scooter a lot. It is comfortable for tall guys, mechanically simply and reliable and - not only fun - but worth working on. I find them to be good value for their current price on the market.
Regarding the Chinese/EBay plastic lowers. This issue gets a lot of controversy on the Helix boards. Aside from a couple issues I have already mentioned, I found these items fits well and offer a very viable alternative to expensive and - getting rarer- OEM lowers. I would not hesitate to go with them again - although I would prefer just re-painting OEM ones.
I will not tackle the paint again. Nor because of the work involved. I had fun repairing them and prepping them for paint. But I spent about $250 for paint and paint-related supplies and got mediocre results. I have not priced it out, but I think perhaps for double that in price, I can get it done professionally and have perfect results. If I could not find a paint shooter that will work with ABS, I have no problem trying it again, but all thing being equal, I would just let the pros do it and bolt on shiny new-like pieces.
Finally, let's add the costs up. Keep in mind I didn't add non-Helix centric items such as the motorcycle lift, random orbital sander. Those are tool costs.
Running Costs:
Utopia Backrest $200
Luggage Rack $ 25
Cee Bailey Windshield $102
Wind Visors $ 64
New Lower Set $150
Grey Primer $ 5
Rust-o-Leum Hammered $ 5
Carb Cleaner $ 4
Glossy grey Paint $ 5
Paint, primer & degreaser $197
Trunk Lid $72
OEM misc parts (screws, fittings, gas filter, etc) $60
Polishing compounds and pads $75
Total project cost: $964
*Update: June 23, 2016
This was my first Helix and I am hooked on these scooters....for all the above reasons. Also, because of it's utility. I go shopping and to garage sales all the time on it. Very economical to do so, and I have strapped on everything from a 4 ft tall heavy punching bag to a microwave on it.
I did sell this Helix - and this was the first time I didn't make a profit on one of my projects. I sold it for $1200, so I took a grand hit.....both literally and figuratively. But I knew that going in that was going to happen. They just don't sell over around $1500....no matter what the condition or mileage.
I sold it because I found a black, 2001 Helix with 4k miles in very good condition in lower Wisconsin. It required no upgrades and had no issues....although now I know to do most anything to the Helix.
I switches seats on the scooter so I got to keep my Utopia backrest, and I will attach the luggage rack on the back.
My current wish is to find a trailer hitch to install for a small cargo trailer. That, or perhaps a cargo style side car?
I wouldn't hesitate to buy one again. Cheers!!
Very impressive!! and a great, thoughtful job,...
ReplyDeleteChocSugaw
2005 Helix CN250
1984 Riva 180 Yamaha
1979 Vespa Piaggio P200E
This is an excellent and outstanding detailed account of a Helix restoration. Thank you so much for posting. I have a barn find 1995 Helix which has been sitting in my heated family room (I have no garage as I live in a townhouse) for many years. I will use your experience as a guide to complete my own restoration. And thank you for the inspiration to finally do it.
ReplyDeleteIn the many years the Helix has been sitting in my house, I have owned and ridden a few other scooters. I'm 6'2", and none provide me with the comfortable stretched out seating position that the Helix does.
Thanks for recording all of this info. While I do not currently own a helix I am giving it some consideration.
ReplyDeleteYour info proved valuable to me. Thanks Again
Pat
Wow! Looks great. Restoration is a valuable pursuit. Enjoy your scoot.
ReplyDeletemomontheloose
Very nice!Will help me for restoring mine!!!Thank you!
ReplyDeleteWhat a project!!! Thanks for sharing your experiences while doing this restoration. I own a 1987 Honda Helix and I love it big time!!!
ReplyDeleteBurgmanite
Great presentation. I just bought my first Helix, P.O. had removed all panels for painting and then had health problems so I bought it stripped. Wondering how the paint has held up after a couple years?
ReplyDeletePaint has held up fine.....
DeletePaint has held up fine.....
DeleteVery good job and very helpful for later Helix projects for me. THANKS !
ReplyDeleteole dad / Ken
I just bought a 1987 which has several issues, neglect, rust, caked mud all over the frame, and other places. I have to repaint from pink: my buddies will not ride with me on a pink bike. I would like to do a lot more to it; I am just going to go real slow and try to keep it on the road as much possible. I really like the bike !!!
ReplyDeleteThanks for taking the time to put this together! 1996 helix owner I picked up non running for $150. I would never put that much into an old scoot...but I most certainly appreciate others that would. I'm cheap nice work and thanks again.
ReplyDeleteWhat a job!!! and thanks for showing us all the steps of a very well documented restoration. I love my 1987 Honda Helix, it is a scooter that I will never sell. I will leave it for one of my daughters, or maybe a grandson.
ReplyDeleteNice One! I really Appreciate it. You did excellent. Thanks for sharing a step by step information. Color of scootor is good. Nice Work Thanks again it is helpful post.
ReplyDeleteVery good . I used this site about 18 months ago when I bought a 1995 Helix dis-assembled for painting and you helped a lot. Thanks again.
ReplyDeleteThanks for all your pictures and posts. I studied your website over the winter. I rode my new to me Helix from Naperville to Gills Rock this summer. Comfortably!
ReplyDeleteVery thorough and informative article. Glad you included all the goodies as well.
ReplyDeleteI have a lead on a 1987 helix and your article has convinced me to take serious pre purchase inspection if it. I am 6'2" and am glad to know that it will fit me.
Cheers
Very thorough and informative article. Glad you included all the goodies as well.
ReplyDeleteI have a lead on a 1987 helix and your article has convinced me to take serious pre purchase inspection if it. I am 6'2" and am glad to know that it will fit me.
Cheers
Do you happen to know how long the piece is that goes down through the seat. Trying to cut one down that was on a gold wing. Seat is way thicker. Thanks
ReplyDeleteVery good read! Love the Helix, it's a blast to ride. You live in Illinois?
ReplyDeleteHey man, but buddy is always looking for somebody to rude with and he's got a black helix 250 and lives downtown Chicago. He's a normal hetero single guy that likes to take road trips and drink a few beers. Shoot me an email with your number to louisianageneral@gmail.com and I'll get y'all in touch. His bike is getting some new wiring right now as a rat crawled up his front fork and chewed up behind his dash while it was parked downtown under michigan avenue.he lives lakefront s of navy pier about 2 blocks.
ReplyDeleteNice! I live in Bolingbrook, & I’m trying to get my hands on a Helix ASAP! According to YouTubers….they are the best scooters ever made! 🛵💨
ReplyDelete- Rob