


While the Goldwing sleeps after its oil change and 12v add-on, I decided to go to town on my 1997 Honda PC800.
I'll admit that I have a 'geek-on' for utility. Most guys drool over either fast bikes, cruisers or chrome-laden show bikes. My heart beats fast for utility and purpose-driven bikes. Versatility, storage, long-lasting, low-cost and ease of maintaining are features and attributes that get my geek-motor humming.
Enter, my 1997 Honda PC-800.
Poorly marketed as the ultimate commuter bike for California tech-yuppies, they didn't sell many from '94 through '98. Considered the 'station wagon' or 'Saab' of motorcycles, I wanted one ever since I read about them. It is so quirky and geek-chic that it is a favorite of engineers and IT guys. A shunned, practical motorcycle that rates embarrassed or curious looks from most fellow riders? Oh yeah, I had to have one.
I searched and searched and found a 1997 with 25,000 miles in Tennessee in January of 2010 for $2500. A good deal considering the cult status of the bike. I couldn't even test ride this bike as it was 9 degrees outside and the sellers' driveway was a skating rink. I tested everything as best I could and did my best to ensure it was a good runner. It certainly looked okay with its plethora of plastic in better than average condition.
It was in good condition when purchased, but I want to bring this back to near showroom condition. Plus, a no-riding Winter here in Illinois drives me crazy and I really needed a project to keep me busy and stay out of my wife's hair.
On a PC800, once you get most of the service related Tupperware off, it makes sense to do everything you can at that time. My list of things to do is extensive and surpass my known mechanical experience, but I am determined and looking forward to diving into the great unknown. But I'm not going alone. From a great PC website, ipcrc (a Yahoo Auto Group) to Youtube, one can find many resources to show or give some suggestions and guidance.
First thing though, if anyone is attempting this sort of thing, is to get a service manual. Really for the exploded illustrations and torque settings...not for any step-by-step instructions. You can find them on Ebay pretty reasonably. But in a pinch if you didn't have one, you can go to any OEM parts on-line supplier (ronayers.com, bikebandit.com, cheapermotorcycleparts.com) like you were searching for a part, and view the exploded views of any part of the bike on microfiche. A great tip for when you need to know the order of how things go back together. "Oh, it's the rubber washer, then the part, then the metal washer, spacer and nut!"
I am one of those guys who needs to take a lot of pics when doing a project, or I wind up with 6 bolts after the everything goes together and go, 'uh oh.' Since I have the pics, I decided to record the project here on my touring blog - even though this really has nothing to do with touring except that it is motorcycle related.


The first thing I did was remove the service-related Tupperware in order to get to the spark plugs and air filter...which is to say, you need to remove a lot of plastic. I put the plastic away from my work area as I am prone to trip, fall, bump and this plastic stuff is expensive.

Removing the plastic to get to the engine reveals a whitish heat and sound shroud which I didn't remove.....even if I knew how....which I don't. There are access holes in this shroud so you can change the plugs. It's a bit like the game "Operation" and you gently feed your spark plug socket - and you need to use the special spark plug socket that came with the bike - through the allotted portals. If you don't have the spark plug wrench that came with the PC, pay the $15 bucks and order a OEM one. The plugs looked good but weren't gapped properly. Time to insert new plugs.
I used a bit of anti-seize compound on the threads and some dialectic grease on the porcelain so the plug boots go on - and come off - easier. I tried to hand feed a plug into position for historical fear of cross-threading...which turned out to be a mistake. I dropped the plugged and it fell into the abyss under the engine shroud and disappeared. Crap!
I shined a light into the narrow hole and could see the plug resting on a ledge on the engine and there was no way I could reach it with my fingers or any tool I had. I ended up using a wire clothes hanger, cut it up and bent into shape and it took me 10 minutes to lasso the plug and carefully lift it through the access hole. Crisis averted.
With all the plastic off, it is easy to just drop in the new air filter into the air filter housing....recommended at 25k...and mine was due for replacement. Many folks go with the K&N set-up which is fine. I just stuck with OEM.
I removed the rear tire - which was pretty straightforward. Prior to getting my impact socket set, I used a 27 mm wrench, laid down parallel to the bike and used my foot to apply leverage and break the axle nut loose. There is a Youtube video of a mechanic removing the tire to give anyone some simple confidence to tackle this job.
(Which bring me to a rant: This is not brain surgery. For the mechanically-enthused, albeit challenged like me, removing anything on the bike seems like an overwhelming task, especially when you read a step-by-step guide. Take heart my friends, it's not that hard. I mean, I could write a step-by-step guide breaking down the steps to walk up a flight of stairs that would take forty pages. Reading this guide would make the task seem daunting...right up until you actually did it. That is why I like seeing Youtube videos of procedures. They de-mystify the step-by-step guides and make them look achievable.....which they are. End of rant.)
I put the center-stand on a piece of 4x4 wood, but it still didn't give me clearance to remove the tire. When you raise the rear trunk hatch however, there are two screws that hold the whole taillight assembly (with one electrical connection that easily unplugs) comes off which allows you to just roll the tire out the rear of the bike. in fact, I learned that with this rear section removed, you can get with just the bike on the center stand.
I had a new Dunlop tire I had gotten on sale from Motorcycle Super Store.com and while back, and had that put on and new wheel bearings installed at Fox Valley Honda. When I got it back, it was time to work on the nasty, pitted and oxidized aluminum. I first wet sanded the aluminum wheel with 220, then 800 grit sandpaper, buffed it with a sewn cotton buffing wheel with brown (tripoli) rouge, then buffed it with a loose cotton buffing wheel with white rouge compound, then rubbed it out with aluminum polish. I re-attached the rear tire this weekend...and it went on without a hitch.

I hope these pics show the difference between the newly polished rear wheel and the still to be polished front wheel.


It may be hard to see here as the camera flash washes out much in the picture, but that white stuff is corrosion and oxidization of the aluminum...with some pitting. I am in the process of taking this tire off as I did the rear tire.
The first thing I have to do on the front wheel is to take off the Moto-Light caliper mounted driving lights. These aluminum billet halogen lights are quality lights and go for $395 new. I will try to re-sell them on Craigslist for $50 as they need to be shined up a bit. They were on the bike when I purchased it and I just don't prefer them. They simply plug into receptacles near the triple-tree under the fairing.
While I have the front wheel off, I will take this opportunity to replace the brake pads, clean the caliper and perhaps attach an extension to the front fender as road debris and stones take a toll of the front cowl.


I figure the brake pads have some life left in them, but they will be replaced none-the-less. The metal back of the pads has a good coat of rust on them and they look past their prime.
The caliper functions well, but man is it crusty. I tried to take a pic of it, but there is rust and grime in the piston cups - inside and out. I will scrub them with hot water and mild de-greaser and see what I have left. I am hoping they will clean up well. New pads are going to cost me about $85 for both front sets and I will replace the rusty clips that holds them in. I will tidy up and try to paint the old painted surfaces and bring them back to life.
I took the front fender off as well. I need to to make room for polishing the pitted and oxidized forks and I will be adding that fender extension anyway.
I am tempted to pull off all the lower plastic and re-paint those pieces as well. Hmmmm.....


Although I do have a propane heater for the garage, it is still kind of cold. So, I take the wheels to the basement for polishing and buffing. This is a pic of my set-up. I cover up the center hub so gunk doesn't get into and cling to the grease.
I would rather also paint the lower plastic in the garage - but temperature is an issue. So, I use my work bench in the basement, open the windows a bit and have at it. For the larger pieces, I will use a box fan as an exhaust fan and have it in a basement window. I will have one window open as a draw, or air ingress, and the box fan in the other window as a forced air-egress point for paint fumes.


Sorry I don't have a pic of this specifically, but I went into the garage this morning I found the PC on its left side!! WTF!!!!!!!!!!!!!!
I righted it and the only thing damaged that I can tell was, of course, the left mirror assembly. I will need a new one of those...and man, that won't be cheap.
No one in the family heard it fall so I can only assume it happened when we weren't home on Christmas Eve. Since this area of the garage is never disturbed, my only guess is that the floor jack slowly lost pressure and the weight of the bike started to make it go down ever so slowly.
The center stand was down and elevated on a piece of 4x4, but with the front tire off the bike, when it sank low enough for the forks to touch the ground, it threw it off balance, went forward, collapsed the center stand and over it went.
I have it back up on the center stand and now have floor stands under each front crash bar (crash covers are off the bike.....lucked out there). It seems pretty solid now.
This is a set back and now I have to find a replacement mirror assembly and figure out how that gets attached.
I have run out of expletives for the moment.....
------------------------------------
The next day: Christmas
The damaged and hanging mirror assembly came off easily. I found a Youtube video about it actually. Basically though, just push the mirror glass towards the bike all the way which will reveal two 5mm bolts. Remove those two bolts and slide the whole assembly off. Simple.
Well, my search for OEM parts found me at ronayers.com. Cheapermotorcycleparts.com came pretty close, but it seems Ron Ayers usually squeaks out a better deal. So, as a Christmas present to myself it seems, I made the following purchase:
Left Mirror Assembly - $209.73
Two sets; frt. brake pads 74.16
Two pad clips 7.65
Shaking off this mishap and carrying on with the project.
-----------------------------------------------------
I started to polish out the lower fork tubes. Tough work doing it by hand. I put the axle back in just to keep the lower fork tubes from twisting. I have noticed different machining surfaces on different parts of the tubes which make this project more laborious. Today I will go back with 800 grit to get some 220 grit scratches out, and then hit it with 1000 grit sandpaper. Then I will use the same buffing wheels and compounds I did on the wheels. After that, I will use aluminum polish as the final cutting agent, wipe it off, clean the whole thing with alcohol, then apply two or three coats of aluminum wheel clear coat (with light sanding in between coats) that I picked up at the local auto store.
I did scrub the calipers clean and am generally pleased with the results. the outside black exterior cleaned up very nicely and won't need a painting touch-up. I did notice on the inside of the left fork tube, at the bottom - right next to the caliper - a deposit of oil/grease which I cleaned. My only conclusion is that it is fork-tube oil. I will keep an eye on this and if it re-collects there, it means that the fork tube seal is leaking and I will have to re-do the forks seals
-----------------------------------------------------------------------
Trying to take advantage of the Christmas break and really get some of the project done. On the schedule today was to finish polishing the lower fork tubes and clear coating them. They came out acceptable and certainly better than there were.


I have the front tire in my 'polishing center' located in my basement. I have one side done and will do the other tomorrow. Then wash it down and clear coat it as well. Can you see the difference btwn the polished side and the un-polished side?


-------------------------------------------------


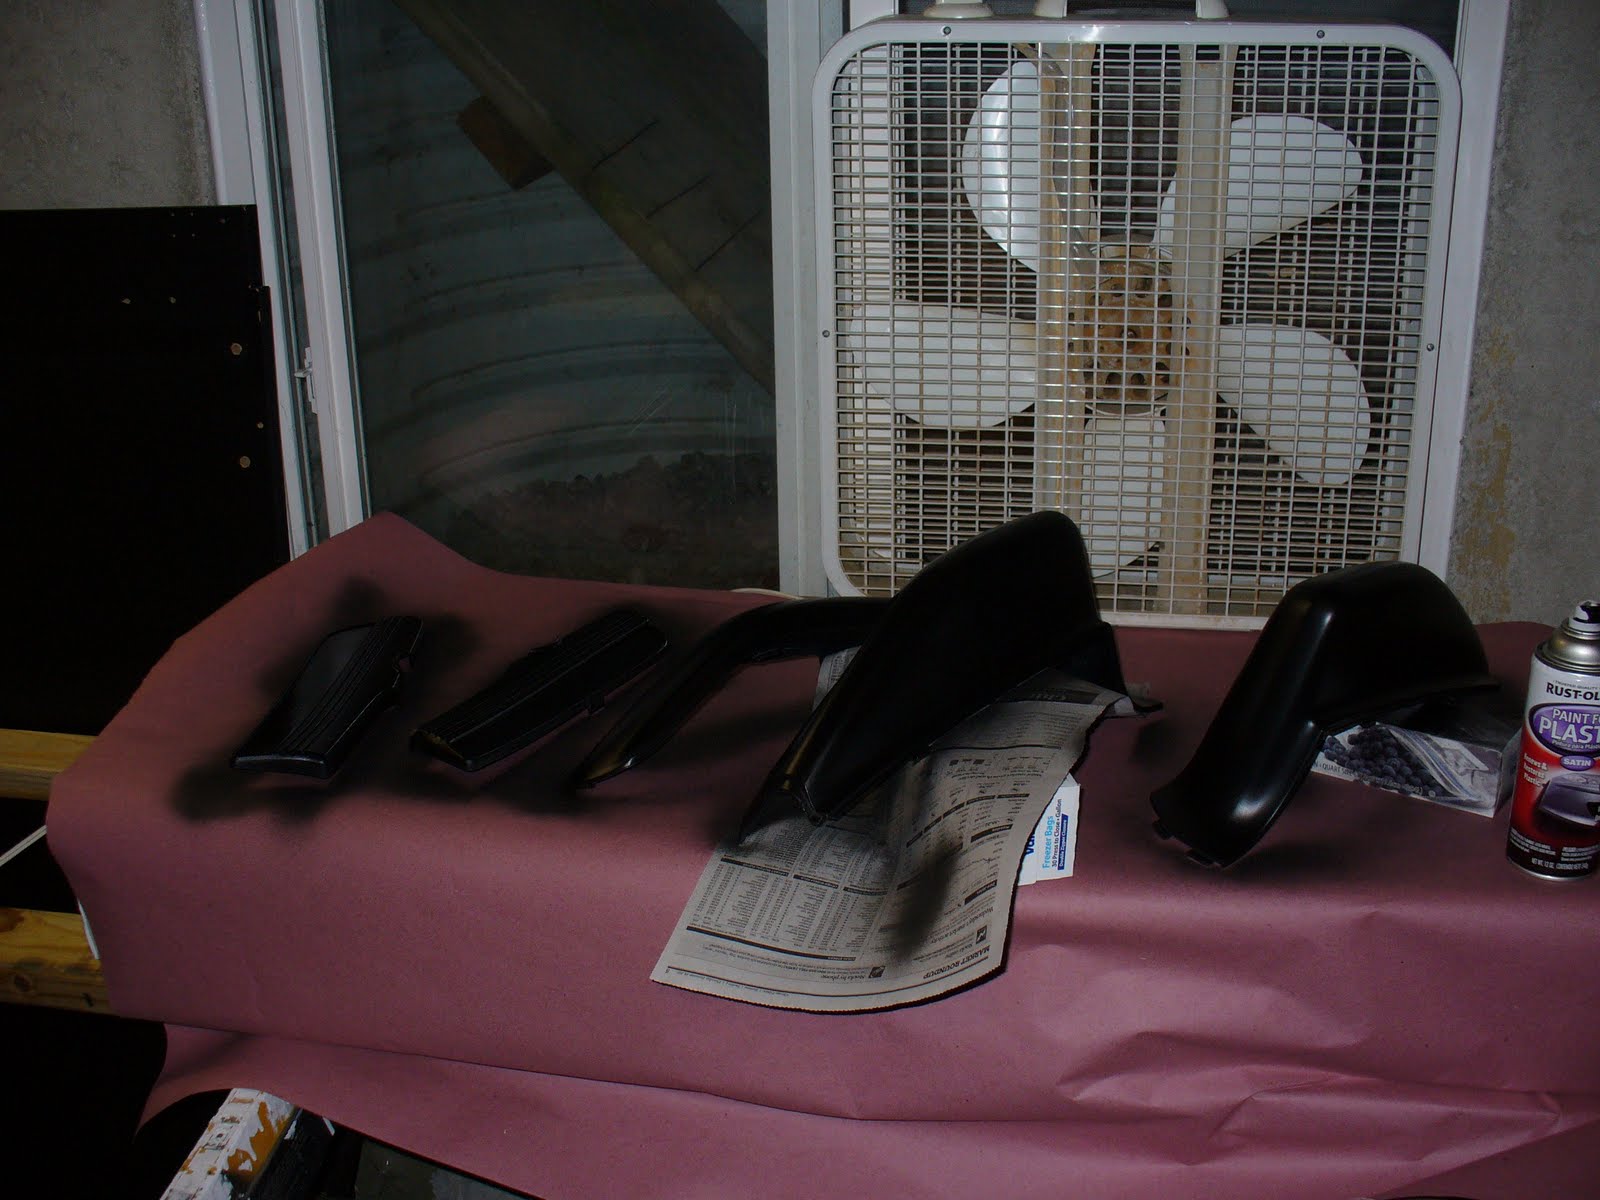
I decided to paint the lower black plastic since there were some color fading, scuffs, chips, etc. The front cowl comes off with four hex bolts indicated in the above pics. I brought that, the service covers and the crash bar covers downstairs to be cleaned and painted. The lower black plastic by the rear brake was difficult to remove without taking the foot rear brake lever off - which proved difficult. To save time, I ended up isolating the now loose piece but keeping it on the bike and painting in place. Same on the other side. I used rattle-can satin black paint made for automotive plastic. Make sure to really clean the pieces and then de-louse with painting prep cleaner or denatured alcohol - or else you get 'fish-eyes' in the finish.
The clear coating of the front wheel is going well. I have three coats now and will rub it out with 1000 grit sandpaper and them polish and see what I get. Note: I wet-sanded all grits because I read about that method in several places. That takes way too long. Instead, I learned to dry sand with the 220 grit - which removes material faster, then wet sand with the 800 grit. Much faster method!
I decided to not get new bearings in the front wheel since the unexpected cost of the new left mirror. I will get the new bearings when I change out the front tire - which I estimate will be in a couple of riding seasons.
I am using this time waiting for parts to arrive, to finish painting the lower plastic and clear coating the wheels.
---------------------------------------------------------
My make-shift painting station is working fine. No fumes in the house and the parts are coming along fine. All that's left is the front cowl...and that needs a lot of prep beforehand.


--------------------------------------------
The cowling is the biggest piece of Tupperware off the PC and the most grundgy. It cleaned up nice except for a one inch long gouge I decided not to Bondo. Because of poor lighting, I laid on the first coat too heavy and developed 'orange peel' in the dried surface. I re-sanded with 220, then 800 grit sandpaper and did it right - with 3 very light coats. It came out nice and I can't wait to get it back on the bike.


--------------------------------------------------------------
It's 46 degrees out and a perfect day to get some work done on the PC in the garage. My parts came in with mixed results. The side mirror assembly I ordered arrived - but it was '89 white, instead of the '97 red. Ug. Called Ron Ayers Honda and they will be sending the correct one, and I will be returning the wrong one. No big thing time wise, but it is a hassle and I had to shell out $10 for shipping back the wrong item.
But the brake pads and pads clips are spot on.
Next was the 'Fenda Extenda' I ordered from Streetfighters by Design. Below you will see the problem:


There was no way this was the right piece for my PC fender! I called David at Streetfighters by Design, who was very pleasant, and we matched numbers to parts; he went into the warehouse and pulled an identical piece and played with it. I even sent him the above pics and he deduced was that I didn't have an OEM fender. Huh? He explained that he has shipped about 100 of these mud flaps for the PC's and never had a complaint.
I looked at my fender to check for any Honda markings, numbers or insignias but found none. I am starting to believe he may be right:


I don't know, but next time I see another PC'er, I am going to pay attention to their front fender. So the 'Fender Extenda' is going back.
Next on the agenda is changing the coolant. I removed the left lower Tupperware which came off easily. A tip I learned from re-attaching the other sides lower plastic is this: Raise the trunk to get better access to the rear bolt on that plastic piece. Actually, it's not the bolt that's the issue; its the rubber mechanism that holds that lower plastic piece and the next piece of plastic to the rear together...and you have to stretch it to fit around both pieces little tabs.
Anyway, I removed the right fairing pocket cover which exposes the radiator cap and coolant overflow bottle:

Remember to unscrew the tiny phillips screw that secures the rad cap on or you'll frustrate yourself trying to turn that cap. I was happy to see no rusty crust under the cap and actually, the coolant looked to be in decent nic....but time to change it none-the-less. I was a bit taken a aback at the positioning and shape of the coolant overflow bottle. I thought I would be able to get a turkey baster syringe in there to extract any fluid in the bottom of that reservoir. The funky shape of that bottle prevented me from doing so, and looking up underneath the fairing, I didn't see any ready access to a tube coming out of the bottom of that bottle to drain it. But in fact, I didn't see much fluid at all in that overflow bottle, so I just left it alone.
With the rad cap off, and the left lower plastic off, I had access to the drain bolt right at the water pump:

I used 1 32oz bottle and about 3/4 of another - of Honda pre-mixed coolant...so I'm guessing around 50oz total. I made sure to start it, get it up to temperature, and add more slowly until it was filled properly. Don't forget to replace the copper washer on the drain bolt. Done.
Since I didn't have a mud flap to install, but I had the new brake pads and I just installed the rotors (used medium thread lock)on my newly clear-coated front wheel, I guess I was ready to install the front wheel.
First, I installed the new pads and clips into the left and right calipers. That was easy and took 10 minutes if that. I then installed my apparently non-OEM front fender into place, and the brake-line brackets that go inbetween the fender and the forks. That took some fanagaling, but got it done without scratching the fender.
I then got the jack under the bike again (I am always nervous about doing this) with a piece of 2x4 on the jack under the engine and started to raise the front end.
I then applied some white lithium grease to the speedo assembly - that was looking kind of dry. I also had to refer to the service manual to make sure I had all my parts ready and in the right order. I lightly greased the axle, rolled the front tire into position. Since I left the left caliper on the bike the whole time, I just lined up the rotor with that caliper and snugly rolled it into the caliper. I then inserted the speedo assembly into place on the left side, the bushing onto the right side, and slid the greased axle through it all. I had to jiggle the tire a bit to line up all the holes, but it went through pretty easily.
Now I screwed the axle bolt into place, and before I tightened and torque the pinch bolts on both axles, I torqued the axle bolt down. But apparently I didn't set the torque wrench correctly and thought that I was over-tightening...which I was. I had it set at over 100...but it didn't 'click' so I never reached that. I had to use the impact wrench to get it off, then re-torqued it at the requisite 65 fp. Pinch bolts followed.


I need a new upper flange bolt for the right caliper - because I removed the caliper mounted Moto-Lights and now have too long of bolts.
Once I get the caliper mounted correctly, I have just a few things to do: Replace/bleed brake and clutch fluid, replace gear oil, remove and clear coat rear wheel...and I think I will trailer the PC to a mechanic and have them clean, adjust and sync the carbs while the plastic is off in that area. It hesitates too much when giving it the gas.
---------------------------------------------------------------
Changing the Clutch Fluid 101 (Rather, how to screw it up royally and fix it again)
53 degrees out in January, in Chgo! Great day to work on the PC with the garage doors open!
So, I read all I could and watched a few Youtube vids about how to change and then bleed your clutch fluid. I have never bled anything before ....unless you count my nose and various limbs from being a cop. Actually, prior this, I thought the clutch fluid was a special type of fluid and not just DOT 4 brake fluid. So, I got to avoid the parts guy at Honda laughing when I would have said in a cocky manner ,"No, no buddy, I don't need brake fluid. I need clutch fluid!" Pays to read.
I removed the left lower cover and blanketed my plastic around the clutch fluid reservoir with clean rags. Every piece of plastic in a 12 mile radius was covered based on all the warnings I read about this. I went to Ace Hardware and bought some 3 foot sections of clear tubing - I got three different sizes because I didn't know the correct size and wasn't about to go back and forth. At 21 cents a foot, I splurged.

The tubing fit over the clutch bleeder valve snugly so I didn't need a clamp, and I hung that down to a old, plastic tub on the ground. I had my 10mm box wrench at the ready. I then unscrewed the cover, lifted out the plastic gasket-cover-thingy and placed that like it was radioactive - far away from plasticville. The fluid looked a bit murky and it's supposed to be clear and really, I just got this bike last year; I had no idea when it was changed last...if ever.
I didn't have a syringe to suck most of the old fluid out of the reservoir, so I used paper towels to wick up most of it - being careful not to allow air into the line. I added some new fluid, pumped the handle 3 or 4 times, then turned the bleeder valve a 1/4 turn and watched the old fluid escape down the tube. Not that the old stuff was in better light and in a clear tube, it really appeared to be darker. Glad I was doing this.
I kept up this routine; filling the reservoir, squeezing the clutch handle, opening the bleeder valve, closing the bleeder valve, then releasing the handle. I did this a dozen or so times until the draining fluid started to change to clear. However, on one of these rotations, I overfilled the reservoir and some new fluid spilled on my rags.
Great. Now I had a HAZMAT situation and I started to panic. I removed the soiled rags, put them in a plastic bag and discarded them, ran and got some cleaner and wiped down the affected plastic several times, then re-ragged the entire scene and was ready for surgery once more.


Unfortunately, this incident broke my routine of filling, bleeding and pumping and while pumping the clutch lever and watching the pretty liquid drain from the tube, I heard this sucking air sound...and my eyes flew open! Oh no!!! The one thing I was supposed to NOT do! Now I have air in the lines and my clutch handle is as floppy as Hugh Hefner without Viagra. Crap.
Well, I stuck to the routine of filling, pumping and bleeding hoping to see air bubbles come out the tube...and probably wasted half of bottle of DOT 4 fluid doing so. The handle was still unresponsive and I was fearful that my PC was going to code and I had lost the patient on the table.
So I filled her up again, but instead of squatting down and watching the clear drain tube, I squeezed the clutch handle and watched little air bubbles float up in the reservoir. Then I remembered that bubbles generally rise....duh. I just started slowly squeezing the clutch handle and more bubbles appeared...and some bigger ones at that. The air was leaving the line!
Soon, the handle started to have some life in it and was back to normal. Oh yeah, I also turned the handle bars the opposite way a bit so the reservoir was level instead of tilted when you have the wheel straight. Lessons learned.
---------------------------------------------------------


Clutch fluid changed, I started to put on the newly painted lower plastic. That front cowl looks great and my crappy pics do it no justice. All the plastic came out good and I am happy how it looks. All I am waiting for now is the caliper bolts to finish up that job, and then I will take it in for carb work before putting all the plastic back on.
-------------------------------------------------------
Kind of at a stand still. Waiting for two back-ordered caliper bolts to complete the front brake job - which is holding up everything else. THEN, I can change and bleed the brakes and get the bike in riding condition; which then I can change out the gear oil ( I need to ride the bike to get the oil warmed first, so it can flow out easily and more completely). THEN, I will trailer it - semi-naked (bike that is) to get the carbs cleaned and sync'd.
Bolts should be in this week. *Note: The correct colored left mirror assembly arrived. Ron Ayer Honda exchanged it with no fuss and in a timely manner. But it doesn't come with the integrated turn signal - which I removed from the old one and screwed it right into the new unit. SO, never toss the damaged one out!
-----------------------------------------------------------------------


So, got a lot done today. First, I got the caliper bolt in so I bolted that up and torqued them down. That done, I bled both front calipers. The old stuff looked like a glass of Jack Daniels that sat out for a month. It supposed to be clear.
Brakes all set, I fired the bike up. This is the first time since both wheels were put on that I rolled her out. I did a few laps around the block and braked a lot to set the new disc pads. They rubbed a bit, then quieted. They are noisy when applied now, but I figured the new disc pads have to marry to the rotor surface. Rear brake needs a little adjusting; just a tad too much play in the pedal. No biggee.
Now that the gear oil had a chance to get warm and thin out a bit, time to change the gear oil. The above pics show that; the old stuff drained out and is in that cup. Nasty. All I did was break the seal on the above 17 mm nut on the right, then removed the lower (Left) hex head drain plug. I used Honda gear lube and it takes nearly the whole bottle. Just make sure that after you fill it with the lube until it starts to leak out, you stop, slowly turn the wheel a few times to circulate the new lube, then wait to see if it comes back to the same level. It took three times doing just that to make sure it rose to that proper level.....and stayed there.
The only problem I ran into was the crush washer on the drain plug. It was stuck on and - try as I might - I couldn't get that bugger off. the soft meal of the washer 'crushed' into the threads of the plug. It spun but was not going anywhere. So, the old one was used and I snugged it up. I like to replace the crush washers when I can, but I have re-used them before also and never, ever had a leak. Next time, if I can't get that crush washer off, I will just have a replacement drain plug ready and replace the whole plug and washer together.
So, at this stage, time to take it in and get the carbs worked on. I will try and get that done this week.
------------------------------------------------------------------
Okay. All set to get the bike over to M&M Cycle in Westmont, IL tomorrow. Here are some pics of it on my little utility trailer:


In the below pics you can see how I secured the rear of the bike. A better option would be to remove the rear crash guards and use the sub-frame as a tie point. But it's cold outside and my fingers don't want to mess with removing those right now. So I use 'soft ties' to loop around the rear grab handles, and soft cloth diapers as cushions where those straps would rub against the trunk plastic. This is the same set-up I used to get the PC back from TN where I bought it.
T


The MC front tire chock really does a good job of securing the bike upright while I go around the tie it down on the four corners.
That is a Canyon Dancer rig for the handle bars.
--------------------------------------------------------------------------
I can't sing the accolades of M&M Cycle (Westmont, IL) enough. I trailered the PC in on Thursday morning and they called later that evening and said it was ready. Wow! They removed the carbs, soaked them, made some adjustments and synced them. Mark, the owner, said, along with clogged jets, the fuel adjustment screws were too tight, starving the carb. He said this is a common factory setting to make govt regulators happy, but 2 1'2 turns 'out' seems to be an ideal setting. He found some loose screws on the frotn wheel (that I admittingly missed) and cautioned me about my cupped front tire. I told him my plan next year to do three major things: new front tire w/ wheel bearings, Progressive springs/new fork seal and installation of tapered steering bearings. Aside from the tire, he quoted me a preliminary labor cost of $400. He also suggested a new battery as mine was almost kaput....but didn't press to sell me one. He suggested a 'glass matt' battery and I will buy one before Spring and install it. Anything to do with a battery on the PC is a pain in the ass, so I also plan to install - and I can't remember what they are called - but a satellite pos/neg post coming off the battery, to wire things to the battery without attaching directly to it. The battery space on the PC is very narrow and difficult to play around in.
Anyway, the PC seems to start and run better now....although it is bitter cold now and I didn't give it a thorough review. Happy camper here though...
---------------------------------------------------------------------------
So, today, 2-19-12, put the non-battery side plastics on as well as the the tank shroud. It's starting to resemble a motorcycle again....thank goodness. Tomorrows plan is to replace the battery with a 'glass-matt' battery. Then I will yank the rear tire off and clear coat it like I did the front wheel.
After that, install the new left mirror, shine everything up and we should be ready for Spring.
NOT looking forward to changing out the battery. Hooking the pos cable up is a PITA.
---------------------------------------------------------------
Monday, Presidents Day, and you would think the local MC stores would carry AGM batteries - but they do not. Most carry regular batteries and some gel batteries. I went and ordered one from the internet, but I am in no hurry since I had to order a hex bolt and flange spacer/bushing to mount the new side mirror from Ron Ayer.com anyhow. More waiting for parts....
On the plus side, I removed the rear tire, sprayed on the clear, and re-mounted the tire. I got the rear tire removal/install down to a science now. Since M&M found loose nuts on the front, I double-checked all my nuts (shut up) and torque settings (80 ft lbs for axle nut, and 20 ft lbs for pinch bolt). Done.
On, one more thing: When I had the bike in the shop for carb work, I noticed a couple of pieces of lower black plastic had orange peel from my painting application. I didn't see it because I have poor lighting, both in my garage and in the basement. So, while I wait for parts, I will fix those.
---------------------------------------------------------------
2-25-12
Time to tackle the battery.....a task I dread.


So, I am trying to head off certain frustration to install this new AGM battery. First, I cut off the red positive rubber boot that cover the positive terminal when the cable is on. It is just too cumbersome to hold that up while trying to line up the terminal screw into the 'floating' nut while keeping the add-on wire ends (12v and Battery Tender) on the terminal screw. Get that boot out of the way and that helps a great deal.
Next, that 'floating nut' that slips into the terminal post floats in that space, which not only makes it hard to line up with the screw, but the nut goes back and forth in that space. Fine if I didn't have two wire leads on the screw because not, that shortens the thread length of the screw, and if that floating nut goes towards the back of that space, the thread will never reach it! .
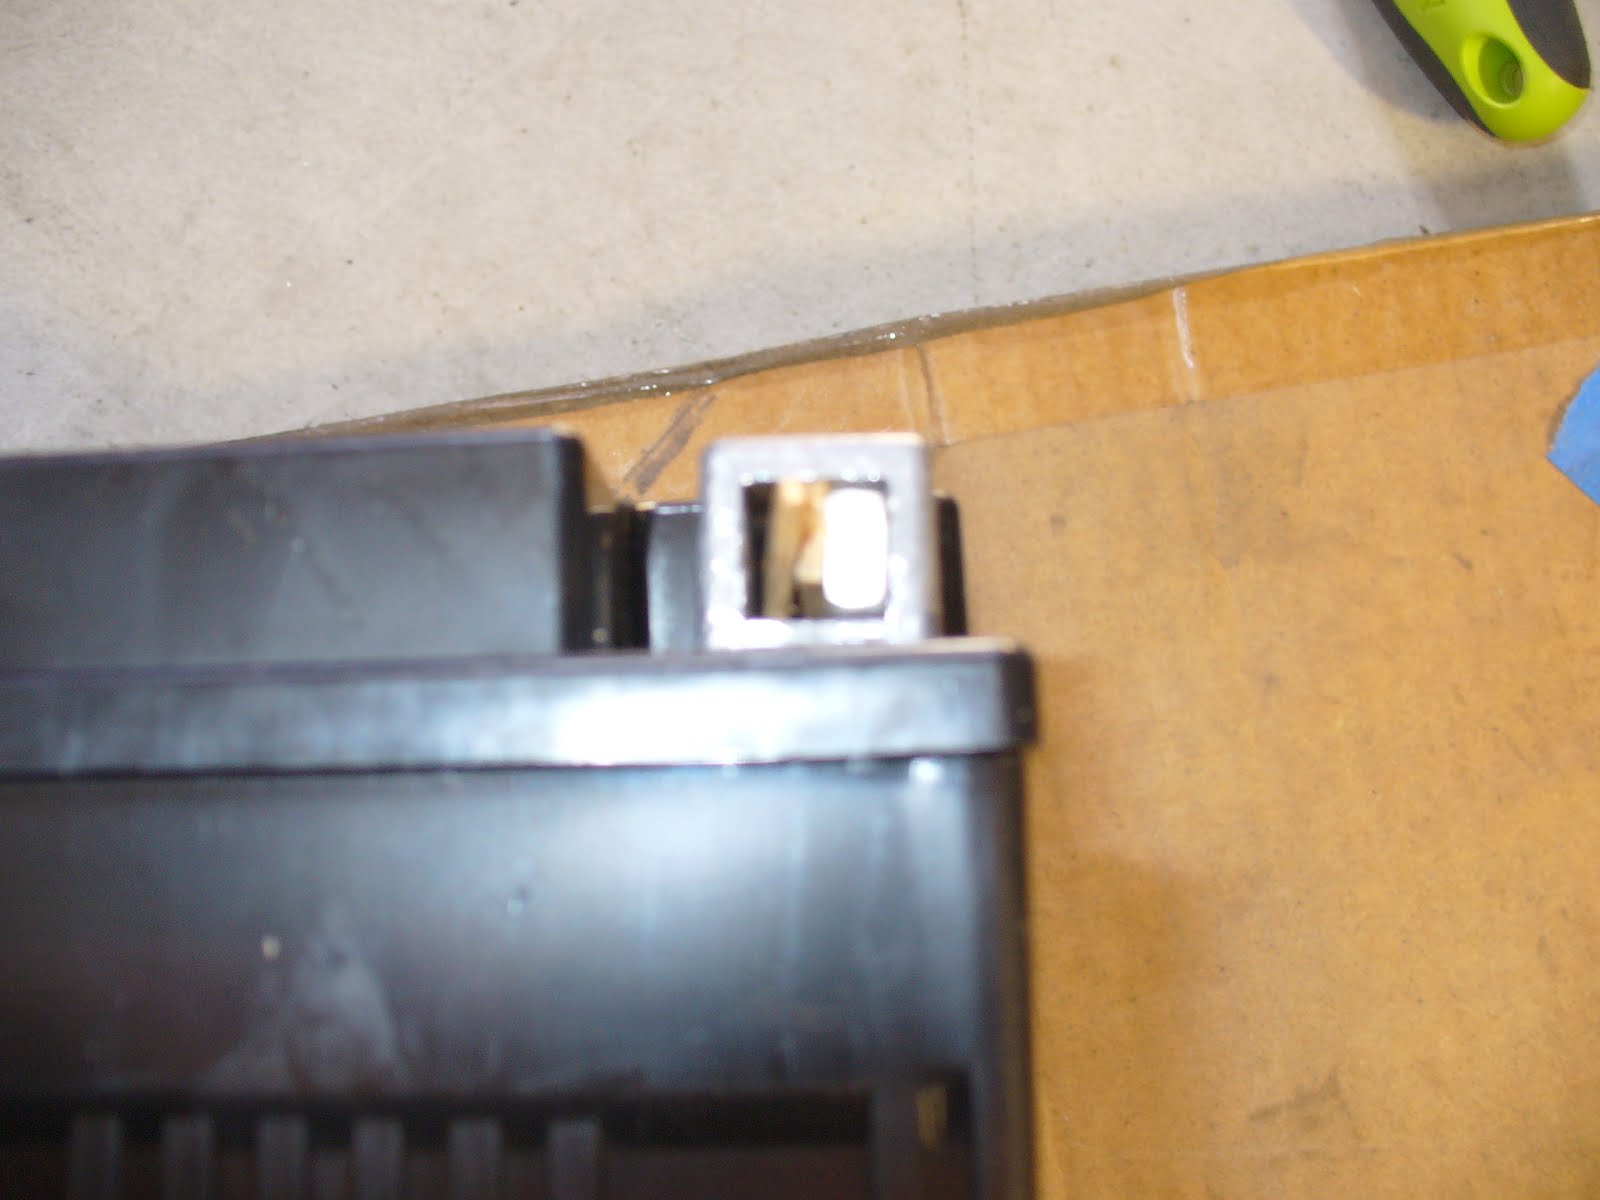
So - and look closely at the above picture and you can see the battery terminal space the floating nut rides in - what I need to do is 'fix' that nut in place so it doesn't move too much, and make sure it definitely doesn't move backwards. I took tiny pieces of a tongue depressor and wedged them behind the nut which shoved the nut to its most forward position and kept it in place. I am not concerned about the wood permanently there. Wood is inert and doesn't conduct.
With those two things done, the job was a snap.

I started the bike and everything was fine. Just for my reference, I wrote the date on the battery so I know how long it will last. Time to put the plastic back on.

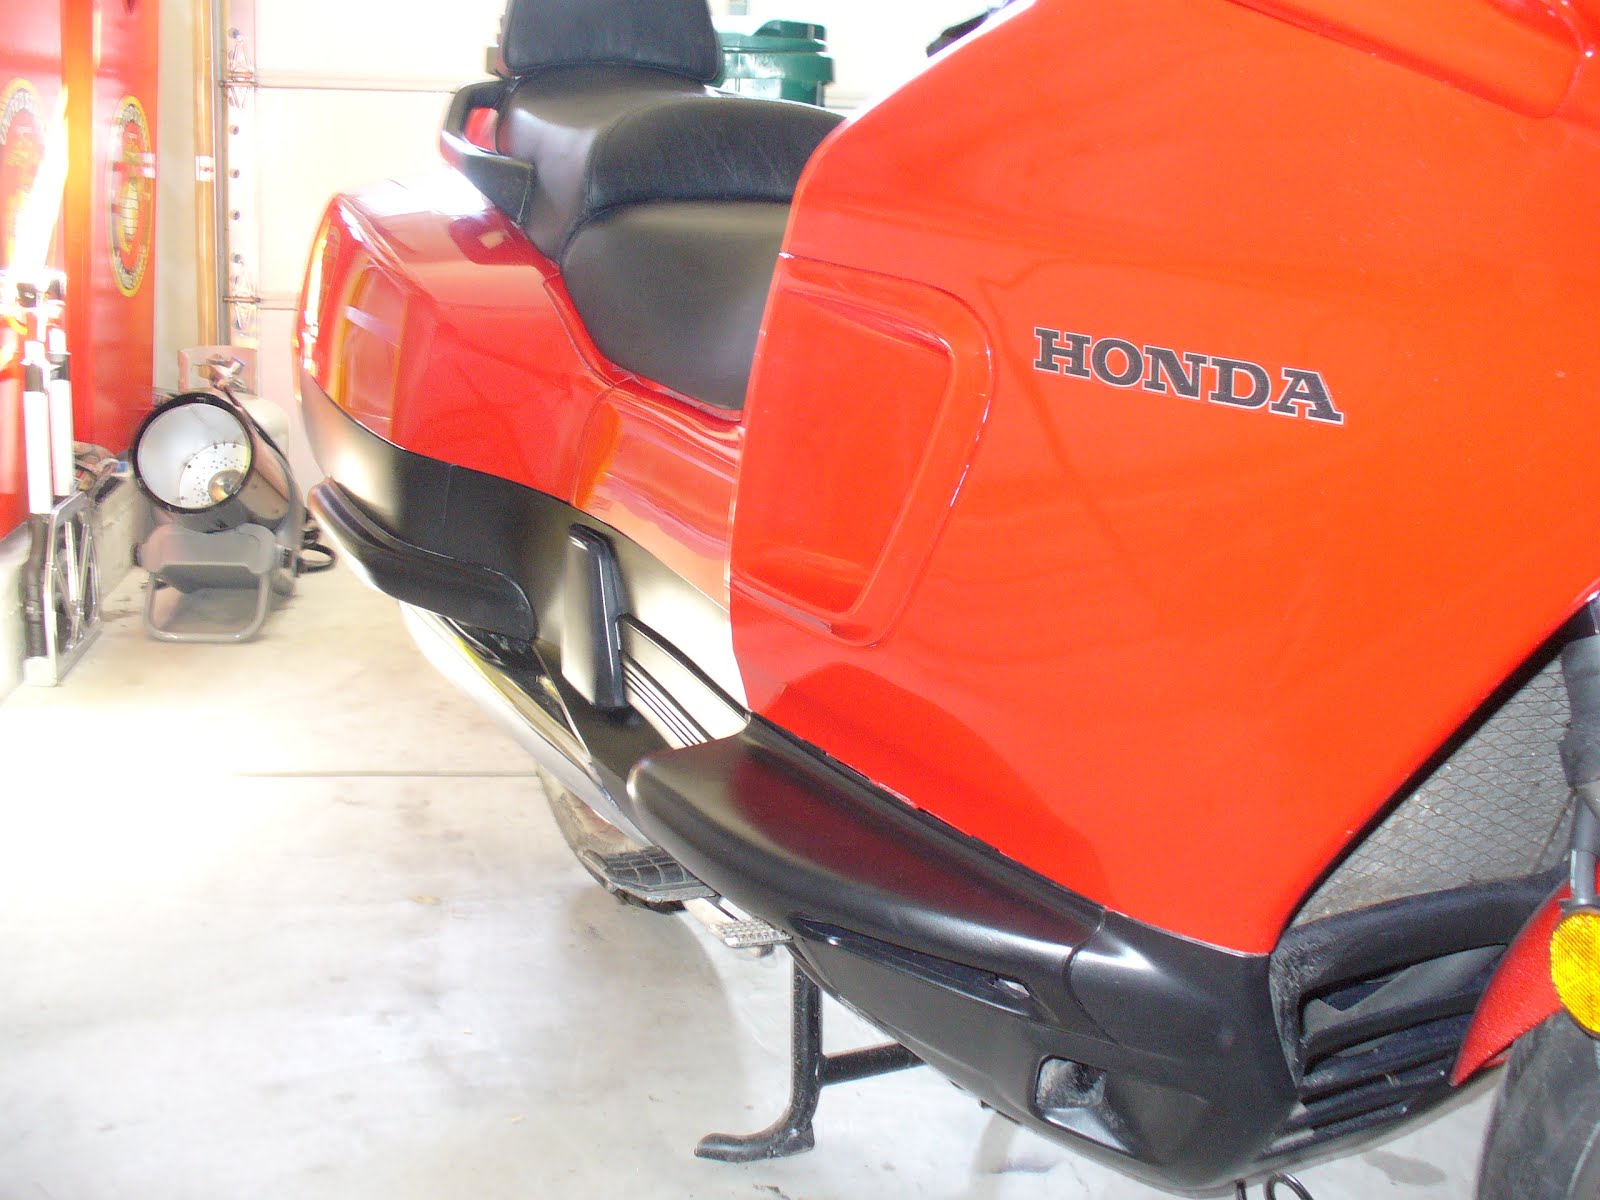

So, I am waiting for one screw to finish mounting the left mirror, but lets call this project DONE. The PC800 doesn't look much different from the outside - except maybe for the black lower plastic which I painted and looks new now. My lousy camera flash makes the red plastic look orange, but it really has a deep, red shine.
But I have the satisfaction of knowing that my PC is in tip-top shape, with new fluids all around, a new tire and battery and some new parts, carbs adjusted and ready for the road.
All total, I spent $979.72 for this Winter project. If I got these things done at a MC shop, I figured the cost would be around $1400. So I saved some money, but I sure learned a lot....and now I feel pretty confident to dive into my bikes and make repairs.
Post job, I am still impressed with the PC. More so, I am fascinated by the technology that goes into the manufacturing of these machines. Color me impressed.
Hope you all enjoyed this process and thank you ipcrc for all your members help in answering the multitude of questions I had.
Running Total of Project:
209.73 Left Mirror Assembly -
74.16 Two sets; frt. brake pads
7.65 Two pad clips
52.14 Rear Wheel bearings w/o-ring
88.00 Rear Tire and Bearing install
40.95 Fenda Extenda
6.00 Clear Coat
6.00 Satin Black ABS Paint
10.51 Spark Plugs
16.79 Spark Plug Wrench
37.81 Air Filter - OEM
3.48 Shaft Oil
6.76 Battery Tender Clips
28.05 5 Gal. 10w40 oil
1.00 (2) Crush Washers
25.00 Misc shop supplies
19.78 Brake Fluid
24.18 Honda Coolant
2.39 Copper Washer - coolant drain bolt
2.64 (2) Caliper bolts
250.00 M7M Cycle - carbs cleaned and synced
67.00 AGM Battery
2.34 Left mirror assembly mounting screw